Quan điểm khi sử dụng Git
Author: Vinh Thanh Nguyen
Git Basics
So, what is Git in a nutshell? This is an important section(phần) to absorb(tiếp thu), because if you understand what Git is and the fundamentals(nguyên tắc cơ bản) of how it works, then using Git effectively(hiệu quả) will probably(có lẻ) be much easier(dễ dàng hơn nhiều) for you. As you learn Git, try to clear your mind of the things you may know about other VCSs, such as CVS, Subversion or Perforce — doing so will help you avoid subtle confusion (tránh nhầm lẫn) when using the tool. Even though Git’s user interface (giao diện người dùng) is fairly similar (khá giống) to these other VCSs, Git stores(lưu trữ) and thinks about information in a very different way (rất khác.), and understanding these differences will help you avoid becoming confused (tránh nhầm lẫn) while using it.
Snapshots, Not Differences
The major difference (khác biệt chính) between Git and any other VCS (Subversion and friends included) is the way Git thinks about its data. Conceptually(Khái niệm), most other systems store information as a list of file-based changes. These other systems (CVS, Subversion, Perforce, Bazaar, and so on) think of the information they store as a set of files and the changes made to each file over time (this is commonly(thường) described(mô tả) as delta-basedversion control).
Chèn hình ảnh
Figure 4. Storing data as changes to a base version of each file.
Git doesn’t think of or store its data this way. Instead, Git thinks of its data more like a series (một loạt) of snapshots of a miniature filesystem (hệ thống thu nhỏ). With Git, every time you commit, or save the state of your project, Git basically(về cơ bản) takes a picture of what all your files look like at that moment(thời điểm đó) and stores a reference(tham chiếu) to that snapshot. To be efficient(hiệu quả), if files have not changed, Git doesn’t store the file again, just a link to the previous identical file (liên kết đến tệp giống hệt trước đó) it has already stored. "Git thinks about its data more like a stream of snapshots."
Chèn hình ảnh
Figure 5. Storing data as snapshots of the project over time.
This is an important distinction (một sự khác biệt quan trọng) between Git and nearly(gần như) all other VCSs. It makes Git reconsider almost every aspect of version control that most other systems copied from the previous generation (Nó làm cho Git xem xét lại hầu như mọi khía cạnh của điều khiển phiên bản mà hầu hết các hệ thống khác được sao chép từ thế hệ trước). This makes Git more like a mini filesystem with some incredibly powerful tools (một số công cụ mạnh mẽ) built on top of it, rather(thay vì) than simply a VCS. We’ll explore(khám phá) some of the benefits(lợi ích) you gain(đạt được) by thinking of your data this way when we cover Git branching(phân nhánh) in Git Branching.
Nearly Every Operation Is Local
Most operations in Git need only local files and resources to operate(hoạt động) — generally(thường) no information is needed from another computer on your network. If you’re used to a CVCS where most operations have that network latency overhead(thời gian chờ trên mạng), this aspect(khía cạnh) of Git will make you think that the gods of speed (vị thần tốc độ) have blessed(ban cho) Git with unworldly(vô hạn) powers. Because you have the entire(toàn bộ) history of the project right there on your local disk, most operations seem almost instantaneous (gần như tức thời).
For example, to browse(duyệt) the history of the project, Git doesn’t need to go out to the server (ra ngoài máy chủ) to get the history and display it for you — it simply reads it directly from your local database. This means you see the project history almost instantly (gần như lập tức). If you want to see the changes introduced (thay đổi được giới thiệu) between the current version of a file and the file a month ago, Git can look up the file a month ago and do a local difference calculation, instead of having to either ask a remote server (thay vì phải yêu cầu máy chủ) to do it or pull an older version (kéo phiên bản cũ) of the file from the remote server to do it locally.
This also means that there is very little you can’t do if you’re offline or off VPN. If you get on an airplane or a train and want to do a little work, you can commit happily(một cách hạnh phúc) (to your local copy, remember?) until(cho đến khi) you get to a network connection to upload. If you go home and can’t get your VPN client working properly (hoạt động bình thường), you can still(vần) work. In many other systems, doing so is either impossible(không thể) or painful(khó chịu). In Perforce, for example, you can’t do much when you aren’t connected to the server; and in Subversion and CVS, you can edit files, but you can’t commit changes to your database (because your database is offline). This may not seem like a huge deal, but you may be surprised what a big difference it can make (Điều này có vẻ không phải là một vấn đề lớn, nhưng bạn có thể ngạc nhiên về sự khác biệt lớn mà nó có thể tạo ra.).
Git Has Integrity
Everything in Git is check-summed(kiểm tra) before it is stored and is then referred to by that checksum (kiểm tra đó). This means it’s impossible(không thể) to change the contents of any file or directory without Git knowing(biết) about it. This functionality(chức năng) is built(tích hợp) into Git at the lowest levels and is integral(không thể thiếu) to its philosophy(triết lý). You can’t lose(mất) information in transit(chuyển tiếp) or get file corruption (hỏng file) without Git being able to detect it (Git có thể phát hiện ra nó.).
The mechanism(cơ chế) that Git uses for this checksumming(kiểm tra) is called a SHA-1 hash. This is a 40-character string composed(bao gồm) of hexadecimal characters (0–9 and a–f) and calculated based on the contents of a file or directory structure in Git. A SHA-1 hash looks something like this:
24b9da6552252987aa493b52f8696cd6d3b00373
You will see these hash values all over the place (khắp nơi) in Git because it uses them so much. In fact (trong thực tế), Git stores everything in its database not by file name but by the hash value of its contents. (Git lưu trữ mọi thứ trong cơ sở dữ liệu của nó chứ không phải theo tên tệp mà bởi giá trị băm của nội dung của nó.)
Git Generally Only Adds Data
When you do actions in Git, nearly(gần như) all of them only add data to the Git database. It is hard to get the system to do anything that is not undoable or to make it erase data in any way (Thật khó để có được hệ thống để làm bất cứ điều gì mà không phải là undoable hoặc để làm cho nó xóa dữ liệu trong bất kỳ cách nào). As with any VCS, you can lose(mất) or mess(hỏng) up changes you haven’t committed yet, but after you commit a snapshot into Git, it is very difficult (rất khó) to lose, especially if you regularly push your database to another repository.(đặc biệt nếu bạn thường xuyên đẩy cơ sở dữ liệu của mình đến một kho lưu trữ khác.)
This makes using Git a joy(niềm vui) because we know we can experiment(thử nghiệm) without the danger(nguy hiểm) of severely screwing things up (làm hỏng mọi thứ). For a more in-depth look at how Git stores its data and how you can recover data that seems lost, see Undoing Things.
The Three States
Pay attention now (Hãy chú ý ngay bây giờ) — here is the main thing to remember about Git if you want the rest(phần còn lại) of your learning process to go smoothly(suôn sẻ). Git has three main states that your files can reside(cư trú) in: committed, modified, and staged:
- Committed means that the data is safely stored in your local database.
- Modified means that you have changed the file but have not committed it to your database yet.
- Staged means that you have marked(đánh dấu) a modified file in its current version to go into your next commit snapshot.
This leads us to the three main sections (3 phần chính) of a Git project: the Git directory, the working tree, and the staging area.
Chèn hình ảnh
Figure 6. Working tree, staging area, and Git directory.
The Git directory is where Git stores the metadata(siêu dữ liệu) and object database for your project. This is the most important part of Git, and it is what is copied when you clone a repository from another computer.
The working tree is a single checkout of one version of the project. These files are pulled out (rút ra khỏi) of the compressed database (CSDL nén) in the Git directory and placed(đặt) on disk for you to use or modify.
The staging area is a file, generally contained in your Git directory, that stores information about what will go into your next commit. Its technical name (tên kỹ thuật) in Git parlance (định danh git) is the “index”, but the phrase(cụm từ) “staging area” works just as well.(cũng gọi tốt)
The basic Git workflow(luồng công việc) goes something like this:
- You modify files in your working tree.
- You selectively(chọn) stage just(chỉ) those(những) changes you want to be part of your next commit, which adds onlythose changes to the staging area.
- You do a commit, which takes the files as they are in the staging area and stores that snapshot permanently(vĩnh viễn) to your Git directory.
If a particular(cụ thể) version of a file is in the Git directory, it’s considered(được gọi) "committed"(đã commit). If it has been modified and was added to the staging area, it is "staged". And if it was changed since it was checked out but has not been staged, it is "modified". In Git Basics, you’ll learn more about these states (các trạng thái này) and how you can either take advantage of them or skip the staged part entirely. (cách bạn có thể tận dụng lợi thế của chúng hoặc bỏ qua hoàn toàn phần dàn dựng.)
The Command Line
There are a lot of different ways to use Git. There are the original command-line tools, and there are many graphical user interfaces of varying capabilities. For this book, we will be using Git on the command line. For one, the command line is the only place you can run all Git commands – most of the GUIs implement only a partial subset of Git functionality for simplicity. If you know how to run the command-line version, you can probably also figure out how to run the GUI version, while the opposite is not necessarily true. Also, while your choice of graphical client is a matter of personal taste, all users will have the command-line tools installed and available.
(Có rất nhiều cách khác nhau để sử dụng Git. Có các công cụ dòng lệnh ban đầu và có nhiều giao diện người dùng đồ họa có các khả năng khác nhau. Đối với cuốn sách này, chúng tôi sẽ sử dụng Git trên dòng lệnh. Đối với một, dòng lệnh là nơi duy nhất bạn có thể chạy tất cả các lệnh Git - hầu hết các GUI chỉ thực hiện một phần nhỏ các chức năng Git để đơn giản. Nếu bạn biết cách chạy phiên bản dòng lệnh, bạn cũng có thể tìm ra cách chạy phiên bản GUI, trong khi điều ngược lại không nhất thiết phải đúng. Ngoài ra, trong khi lựa chọn của bạn về khách hàng đồ họa là một vấn đề về sở thích cá nhân, tất cả người dùng sẽ có các công cụ dòng lệnh được cài đặt và có sẵn.)
So we will expect you to know how to open Terminal in Mac or Command Prompt or Powershell in Windows. If you don’t know what we’re talking about here, you may need to stop and research that quickly so that you can follow the rest of the examples and descriptions in this book.
(Vì vậy, chúng tôi hy vọng bạn sẽ biết cách mở Terminal trong Mac hoặc Command Prompt hoặc Powershell trong Windows. Nếu bạn không biết chúng ta đang nói về điều gì ở đây, bạn có thể cần phải dừng lại và nghiên cứu nhanh chóng để bạn có thể làm theo phần còn lại của các ví dụ và mô tả trong cuốn sách này.)
1.6 Getting Started - First-Time Git Setup
First-Time Git Setup
Now that you have Git on your system, you’ll want to do a few things to customize(tùy chỉnh) your Git environment. You should(nên) have to do these things (làm điều này) only once (một lần) on any given computer (bất kỳ máy tính nào); they’ll stick around between upgrades (nó sẻ gắn kết giữa các lần nâng cấp). You can also change them at any time (bất kỳ thời điểm) by running through the commands again (bằng cách chạy các lệnh).
Git comes(đi kèm) with a tool called git config that lets(cho phép) you get and set configuration variables that control all aspects(khía cạnh) of how Git looks and operates(hoạt động). These variables can be stored in three different places:
Git comes(đi kèm) with a tool called git config that lets(cho phép) you get and set configuration variables that control all aspects(khía cạnh) of how Git looks and operates(hoạt động). These variables can be stored in three different places:
/etc/gitconfigfile: Contains values applied(áp dụng) to every user on the system and all their repositories. If you pass the option--systemtogit config, it reads and writes from this file specifically(đặc biệt). (Because this is a system configuration file, you would(sẻ) need administrative or superuser privilege(quyền) to make changes to it.)~/.gitconfigor~/.config/git/configfile: Values specific personally (giá trị cụ thể cá nhân) to you, the user. You can make Git read and write to this file specifically(đặc biệt) by passing the--globaloption.configfile in the Git directory (that is,.git/config) of whatever(bất kỳ) repository you’re currently using: Specific to that single repository. (cụ thể cho kho lưu trữ duy nhất đó)
Each level overrides values in the previous level, so values in .git/config trump those in /etc/gitconfig.
(Mỗi cấp độ ghi đè các giá trị ở cấp độ trước đó, vì vậy các giá trị trong .git / config sẽ vượt trội hơn trong / etc / gitconfig.)
On Windows systems, Git looks for the .gitconfig file in the $HOME directory (C:\Users\$USER for most people). It also still looks for /etc/gitconfig, although it’s relative to the MSys root, which is wherever you decide to install Git on your Windows system when you run the installer. If you are using version 2.x or later of Git for Windows, there is also a system-level config file at C:\Documents and Settings\All Users\Application Data\Git\config on Windows XP, and in C:\ProgramData\Git\config on Windows Vista and newer. This config file can only be changed by git config -f <file> as an admin.
The first thing you should do when you install Git is to set your user name and email address. This is important because every Git commit uses this information, and it’s immutably baked (lưu trữ một cách bất tận) into the commits you start creating:
Many of the GUI tools will help you do this when you first run them.
If you want to use a different text editor, such as Emacs, you can do the following:
In the case of Notepad++, a popular(phổ biến) programming editor, you are likely(có khả năng) to want to use the 32-bit version, since at the time of writing the 64-bit version doesn’t support all plug-ins. If you are on a 32-bit Windows system, or you have a 64-bit editor on a 64-bit system, you’ll type something like this:
If you have a 32-bit editor on a 64-bit system, the program will be installed in C:\Program Files (x86):
Note
Vim, Emacs and Notepad++ are popular text editors often used by developers on Unix-based systems like Linux and macOS or a Windows system. If you are not familiar with these editors, you may need to search for specific instructions for how to set up your favorite editor with Git.
Warning
You may find, if you don’t setup your editor like this, you get into a really confusing(khó khăn) state when Git attempts(cố gắng) to launch(khởi chạy) it. An example on a Windows system may include a prematurely terminated (kết thúc sớm) Git operation during(suốt) a Git initiated edit.
If you want to check your configuration settings, you can use the git config --list command to list all the settings Git can find at that point:
You may see keys more than once, because Git reads the same key from different files (
You can also check what Git thinks a specific key’s value is by typing git config <key>
Since (Vì) Git might read (có thể đọc) the same configuration variable value from more than one file, it’s possible(khả thi) that you have an unexpected(bất ngờ) value for one of these values and you don’t know why (không biết tại sao). In cases like that, you can query Git as to the origin(nguồn gốc) for that value, and it will tell you which configuration file had the final say in setting that value:
1.7 Getting Started - Getting Help
If you ever(khi nào) need help while using Git, there are two equivalent(tương đương) ways to get the comprehensive(toàn diện) manual page (manpage) help for any of the Git commands:
In addition (ngoài ra), if you don’t need the full-blown manpage help (Nếu bạn không cần trợ giúp man page toàn diện), but just need a quick refresher (cập nhật nhanh) on the available options (các tham số tùy chọn) for a Git command, you can ask for the more concise (rút gọn hơn) “help” output with the -h or --help options, as in:
If you can read only one chapter to get going with Git, this is it. (Nếu bạn có thể đọc chỉ một chương để bắt đầu với Git, đây là nó.) This chapter covers(trình bày) every(tất cả) basic command you need to do the vast majority (phần lớn) of the things you’ll eventually spend (dành thời gian) your time doing with Git. By the end of the chapter, you should be able (có thể) to configure(cấu hình) and initialize(khởi tạo) a repository, begin and stop tracking files, and stage and commit changes. We’ll also show you how to set up Git to ignore(bỏ qua) certain(nhất định) files and file patterns (mẫu file), how to undo mistakes(lỗi sai) quickly and easily, how to browse the history of your project and view changes between commits, and how to push and pull from remote repositories.
Bạn thường có được kho lưu trữ Git theo một trong hai cách:
1. You can take a local directory that is currently not under version control, and turn it into a Git repository, or
Bạn có thể lấy một thư mục cục bộ hiện không nằm dưới sự kiểm soát phiên bản và biến nó thành một kho lưu trữ Git, hoặc
2. You can clone an existing Git repository from elsewhere.
Bạn có thể sao chép kho lưu trữ Git hiện có từ nơi khác.
In either case, you end up with a Git repository on your local machine, ready for work.
Trong cả hai trường hợp, bạn kết thúc với một kho lưu trữ Git trên máy cục bộ của bạn, sẵn sàng cho công việc.
If you have a project directory that is currently not under version control and you want to start controlling it with Git, you first need to go to that project’s directory. If you’ve never done this, it looks a little different depending on which system you’re running:
Nếu bạn có một thư mục dự án hiện không được kiểm soát phiên bản và bạn muốn bắt đầu kiểm soát nó bằng Git, trước tiên bạn cần phải đi đến thư mục của dự án đó.Nếu bạn chưa bao giờ làm điều này, có vẻ hơi khác một chút tùy thuộc vào hệ thống bạn đang chạy:
This creates a new subdirectory named .git that contains all of your necessary repository files — a Git repository skeleton. At this point, nothing in your project is tracked yet. (See Git Internals for more information about exactly what files are contained in the .git directory you just created.)
Điều này tạo ra một thư mục con mới có tên .git chứa tất cả các tệp kho lưu trữ cần thiết của bạn - một kho lưu trữ Git. Tại thời điểm này, không có gì trong dự án của bạn được theo dõi. (Xem Git Internals để biết thêm thông tin về chính xác những tệp nào được chứa trong thư mục .git mà bạn vừa tạo).
If you want to start version-controlling existing files (as opposed to an empty directory), you should probably begin tracking those files and do an initial commit. You can accomplish that with a few git add commands that specify the files you want to track, followed by a git commit:
Nếu bạn muốn bắt đầu phiên bản kiểm soát các tệp hiện có (trái ngược với một thư mục trống), bạn có lẽ nên bắt đầu theo dõi các tệp đó và thực hiện một cam kết ban đầu. Bạn có thể thực hiện điều đó bằng một vài lệnh git add chỉ định các tệp mà bạn muốn theo dõi, theo sau là một git commit:
Chúng ta sẽ xem xét những lệnh này chỉ trong một phút. Tại thời điểm này, bạn có một kho lưu trữ Git với các tệp được theo dõi và một cam kết ban đầu.
If you want to get a copy of an existing Git repository — for example, a project you’d like to contribute to — the command you need is git clone. If you’re familiar with other VCS systems such as Subversion, you’ll notice that the command is "clone" and not "checkout". This is an important distinction — instead of getting just a working copy, Git receives a full copy of nearly all data that the server has. Every version of every file for the history of the project is pulled down by default when you run git clone. In fact, if your server disk gets corrupted, you can often use nearly any of the clones on any client to set the server back to the state it was in when it was cloned (you may lose some server-side hooks and such, but all the versioned data would be there — see Getting Git on a Server for more details).
Nếu bạn muốn lấy một bản copy của kho lưu trữ Git đã có trước đó. Ví dụ: Dự án mà bạn muốn đóng góp. Câu lệnh bạn cần là git clone. Nếu bạn đã quen thuộc với các hệ thống VSC khác như Subversion. Bạn sẻ thấy rằng đây là lệnh CLONE chứ không phải là CHECKOUT. Đây là một sự khác biệt quan trọng. Thay vì chỉ nhận được bản sao làm việc. Git lấy một bản sao đầy đủ gần như tất cả dữ liệu mà máy chủ có. Mỗi phiên bản của mỗi tập tin cho lịch sử của dự án được kéo xuống theo mặc định khi bạn chạy git clone. Trong thực tế, nếu đĩa máy chủ của bạn bị hỏng, bạn có thể sử dụng bất kỳ bản sao nào trên bất kỳ ứng dụng khách nào để đặt máy chủ về trạng thái khi nó được nhân bản (bạn có thể mất một số móc nối phía máy chủ hoặc các data tương tự như vậy). Nhưng tất cả các version của data vẫn ở đó, xem Getting Git on a Server để xem các nội dung khác)
You clone a repository with git clone <url>. For example, if you want to clone the Git linkable(có thể liên kết) library called libgit2, you can do so like this:
Điều này tạo ra một thư mục có tên là libgit2. Khởi tạo một thư mục có tên là libgit2, khởi tạo một tên thư mục tên là .git bên trong nó, Kéo xuống tất cả dữ liệu cho kho lưu trữ đó và một bản sao làm việc của phiên bản mới nhất. Nếu bạn đi vào thư mục libgit2 vừa mới tạo, bạn sẻ thấy các tệp dự án ở trong đó, sẳn sàng làm việc hoặc được sử dụng.
If you want to clone the repository into a directory named something other than libgit2, you can specify that as the next command-line option:
Git has a number of different transfer protocols you can use. The previous example uses the https:// protocol, but you may also see git:// or user@server:path/to/repo.git, which uses the SSH transfer protocol. Getting Git on a Server will introduce all of the available options the server can set up to access your Git repository and the pros and cons of each.
Git có một số giao thức truyền khác nhau mà bạn có thể sử dụng. Ví dụ trước sử dụng giao thức https
, nhưng bạn cũng sẻ thấy git:// hoặc user@server:path/to/repo.git, chỗ khác sử dụng giao thức SSH. Getting Git on a Server sẻ giới thiệu tất cả các tùy chọn có sẳn mà máy chủ có thể thiết lập để truy cập kho lưu trữ Git của bạn và các ưu khuyết điểm của mỗi máy chủ.
2.2 Git Basics - Recording Changes to the Repository
At this point, you should have a bona fide (thật sự) Git repository on your local machine, and a checkout or working copy of all of its files in front of you. Typically(thông thường), you’ll want to start making changes and committing snapshots of those changes (những thay đổi đó) into your repository each time the project reaches(đạt tới) a state you want to record.
Remember that each file in your working directory can be in one of two states: tracked or untracked. Tracked files are files that were (có trong) in the last snapshot; they can be unmodified, modified, or staged. In short, tracked files are files that Git knows about.
Untracked files are everything else — any files in your working directory that were not in your last snapshot and are not in your staging area. When you first clone a repository, all of your files will be tracked and unmodified because Git just checked them out and you haven’t(chưa) edited anything.
As you edit files, Git sees them as modified, because you’ve changed them since your last commit. As you work, you selectively(có chọn lọc) stage these modified files and then commit all those staged changes, and the cycle repeats.
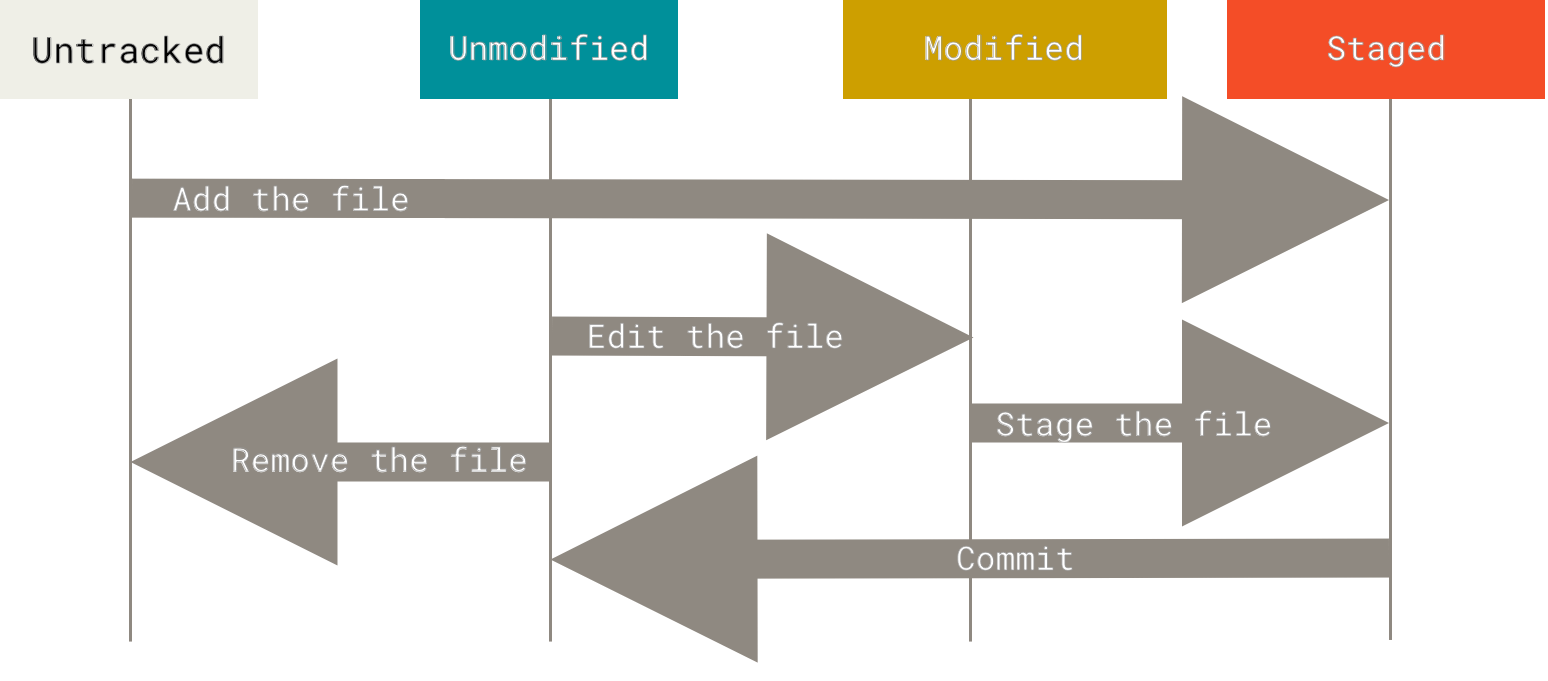
Figure 8. The lifecycle of the status of your files.
Let’s say you add a new file to your project, a simple README file. If the file didn’t exist before, and you run git status, you see your untracked file like so:
$ cat .gitignore
*.[oa]
*~
The first line tells Git to ignore any files ending in “.o” or “.a” — object and archive files that may be the product of building your code. The second line tells Git to ignore all files whose names end with a tilde (~), which is used by many text editors such as Emacs to mark temporary files. You may also include a log, tmp, or pid directory; automatically generated documentation; and so on. Setting up a .gitignore file for your new repository before you get going (trước khi bắt đầu) is generally(thường) a good idea so you don’t accidentally(vô tình) commit files that you really don’t want in your Git repository.
The rules for the patterns you can put in the .gitignore file are as follows:
Glob patterns are like simplified(đơn giản hóa) regular expressions that shells use. An asterisk (*) matches zero or more characters; [abc] matches any character inside the brackets (in this case a, b, or c); a question mark (?) matches a single character; and brackets enclosing characters separated by a hyphen ([0-9]) matches any character between them (in this case 0 through 9). You can also use two asterisks to match nested directories; a/**/z would match a/z, a/b/z, a/b/c/z, and so on.
Here is another example .gitignore file:
# ignore all .a files
*.a
# but do track lib.a, even though you're ignoring .a files above
!lib.a
# only ignore the TODO file in the current directory, not subdir/TODO
/TODO
# ignore all files in the build/ directory
build/
# ignore doc/notes.txt, but not doc/server/arch.txt
doc/*.txt
# ignore all .pdf files in the doc/ directory and any of its subdirectories
doc/**/*.pdf
Tip
GitHub maintains(duy trì) a fairly comprehensive list of good (một danh sách khá tốt) .gitignore file examples for dozens of projects (hàng chục dự án) and languages at https://github.com/github/gitignore if you want a starting point for your project.
Note
In the simple case, a repository might(có thể) have a single .gitignore file in its root directory, which applies recursively (áp dụng đệ quy) to the entire(toàn bộ) repository. However, it is also possible(có thể) to have additional(bổ sung) .gitignore files in subdirectories. The rules in these nested(lồng nhau) .gitignore files apply only to the files under the directory where they are located. (The Linux kernel source repository has 206 .gitignore files.)
It is beyond(nằm ngoài) the scope of this book to get into the details of multiple .gitignore files; see man gitignore for the details.
Let’s say you edit and stage the README file again and then edit the CONTRIBUTING.md file without staging it. If you run your git status command, you once again see something like this:
If you want to see what you’ve staged that will go into your next commit, you can use git diff --staged. This command compares your staged changes to your last commit:
For another example, if you stage the CONTRIBUTING.md file and then edit it, you can use git diff to see the changes in the file that are staged and the changes that are unstaged. If our environment looks like this:
Git Diff in an External Tool
We will continue to use the git diff command in various ways (nhiều cách khác nhau) throughout(trong suốt) the rest(phần còn lại) of the book. There is another way to look at these diffs if you prefer(thích) a graphical(đồ họa) or external diff viewing program instead (chương trình so sánh bên ngoài). If you run git difftool instead of git diff, you can view any of these diffs in software like emerge, vimdiff and many more (including commercial(thương mại) products). Run git difftool --tool-help to see what is available on your system.
The editor displays the following text (this example is a Vim screen):
Alternatively(Cách khác), you can type your commit message inline with the commit command by specifying(chỉ định) it after a -m flag, like this:
$ git commit -m "Story 182: Fix benchmarks for speed"
[master 463dc4f] Story 182: Fix benchmarks for speed
2 files changed, 2 insertions(+)
create mode 100644 README
Now you’ve created your first commit! You can see that the commit has given you some output about itself: which branch you committed to (master), what SHA-1 checksum the commit has (463dc4f), how many files were changed, and statistics about lines added and removed in the commit.
Remember that the commit records the snapshot you set up in your staging area. Anything you didn’t stage is still sitting there modified (Vẫn đang ở trạng thái modified); you can do another commit to add it to your history. Every time you perform a commit, you’re recording a snapshot of your project that you can revert to or compare to later.
Notice (để ý) how you don’t have to run git add on the CONTRIBUTING.md file in this case before you commit. That’s because the -a flag includes all changed files. This is convenient (tiện lợi), but be careful(cẩn thận); sometimes this flag will cause you to include unwanted changes.
If you simply remove the file from your working directory, it shows up under the “Changes not staged for commit” (that is, unstaged) area of your git status output:
Then, if you run git rm, it stages the file’s removal:
Another useful thing you may want to do is to keep the file in your working tree but remove it from your staging area. In other words, you may want to keep the file on your hard drive but not have Git track it anymore. This is particularly(đặc biệt) useful if you forgot to add something to your .gitignore file and accidentally(vô tình) staged it, like a large log file or a bunch of .a compiled files. To do this, use the --cached option:
Thus it’s a bit confusing (có một chút bối rối) that Git has a mv command. If you want to rename a file in Git, you can run something like:
2.3 Git Basics - Viewing the Commit History
These examples use a very simple project called “simplegit”. To get the project, run
A huge(lớn) number and variety(đa dạng) of options to the git log command are available to show you exactly what you’re looking for. Here, we’ll show you some of the most popular(phổ biến).
One of the more helpful options is -p or --patch, which shows the difference (the patch output) introduced(giới thiệu) in each commit. You can also limit the number of log entries(mục) displayed, such as using -2 to show only the last two entries.
Another really useful option is --pretty. This option changes the log output to formats other than the default. A few prebuilt(dựn sẵn) options are available for you to use. The oneline option prints each commit on a single line, which is useful if you’re looking at a lot of commits. In addition, the short, full, and fuller options show the output in roughly(gần như) the same format but with less or more information, respectively(tương ứng):
You may be wondering(tự hỏi) what the difference is between author and committer. The author is the person who originally wrote the work, whereas(trong khi) the committer is the person who last applied the work. So, if you send in a patch to a project and one of the core members applies the patch, both of you get credit — you as the author, and the core member as the committer. We’ll cover this distinction(phân biệt) a bit more in Distributed Git.
The oneline and format options are particularly(đặc biệt) useful with another log option called --graph. This option adds a nice little ASCII graph showing your branch and merge history:
Those are only some simple output-formatting options to git log — there are many more. Common options to git log lists the options we’ve covered so far (chúng tôi đã đề cập đến giờ), as well as (cũng như) some other common formatting options that may be useful, along with how they change the output of the log command.
Table 2. Common options to git log
Option Description
-p
Show the patch introduced with each commit.
--stat
Show statistics for files modified in each commit.
--shortstat
Display only the changed/insertions/deletions line from the --stat command.
--name-only
Show the list of files modified after the commit information.
--name-status
Show the list of files affected with added/modified/deleted information as well.
--abbrev-commit
Show only the first few characters of the SHA-1 checksum instead of all 40.
--relative-date
Display the date in a relative format (for example, “2 weeks ago”) instead of using the full date format.
--graph
Display an ASCII graph of the branch and merge history beside the log output.
--pretty
Show commits in an alternate format. Options include oneline, short, full, fuller, and format (where you specify your own format).
--oneline
Shorthand for --pretty=oneline --abbrev-commit used together.
Limiting Log Output
In addition to output-formatting options, git log takes a number of useful limiting options — that is, options that let you show only a subset of commits. You’ve seen one such option already — the -2 option, which displays only the last two commits. In fact, you can do -<n>, where n is any integer to show the last n commits. In reality, you’re unlikely to use that often, because Git by default pipes all output through a pager so you see only one page of log output at a time.
However, the time-limiting options such as --since and --until are very useful. For example, this command gets the list of commits made in the last two weeks:
$ git log --since=2.weeks
This command works with lots of formats — you can specify a specific date like "2008-01-15", or a relative date such as "2 years 1 day 3 minutes ago".
You can also filter the list to commits that match some search criteria. The --author option allows you to filter on a specific author, and the --grep option lets you search for keywords in the commit messages.
Note
You can specify more than one instance of both the --author and --grep search criteria, which will limit the commit output to commits that match any of the --author patterns and any of the --grep patterns; however, adding the --all-match option further limits the output to just those commits that match all --grep patterns.
Another really helpful filter is the -S option (colloquially referred to as Git’s “pickaxe” option), which takes a string and shows only those commits that changed the number of occurrences of that string. For instance, if you wanted to find the last commit that added or removed a reference to a specific function, you could call:
$ git log -S function_name
The last really useful option to pass to git log as a filter is a path. If you specify a directory or file name, you can limit the log output to commits that introduced a change to those files. This is always the last option and is generally preceded by double dashes (--) to separate the paths from the options.
In Options to limit the output of git log we’ll list these and a few other common options for your reference.
Table 3. Options to limit the output of git log
Option Description
-<n>
Show only the last n commits
--since, --after
Limit the commits to those made after the specified date.
--until, --before
Limit the commits to those made before the specified date.
--author
Only show commits in which the author entry matches the specified string.
--committer
Only show commits in which the committer entry matches the specified string.
--grep
Only show commits with a commit message containing the string
-S
Only show commits adding or removing code matching the string
For example, if you want to see which commits modifying test files in the Git source code history were committed by Junio Hamano in the month of October 2008 and are not merge commits, you can run something like this:
$ git log --pretty="%h - %s" --author=gitster --since="2008-10-01" \
--before="2008-11-01" --no-merges -- t/
5610e3b - Fix testcase failure when extended attributes are in use
acd3b9e - Enhance hold_lock_file_for_{update,append}() API
f563754 - demonstrate breakage of detached checkout with symbolic link HEAD
d1a43f2 - reset --hard/read-tree --reset -u: remove unmerged new paths
51a94af - Fix "checkout --track -b newbranch" on detached HEAD
b0ad11e - pull: allow "git pull origin $something:$current_branch" into an unborn branch
Of the nearly 40,000 commits in the Git source code history, this command shows the 6 that match those criteria.
Tip
Preventing the display of merge commits
Depending on the workflow used in your repository, it’s possible that a sizable percentage of the commits in your log history are just merge commits, which typically aren’t very informative. To prevent the display of merge commits cluttering up your log history, simply add the log option --no-merges.
(Mỗi cấp độ ghi đè các giá trị ở cấp độ trước đó, vì vậy các giá trị trong .git / config sẽ vượt trội hơn trong / etc / gitconfig.)
On Windows systems, Git looks for the .gitconfig file in the $HOME directory (C:\Users\$USER for most people). It also still looks for /etc/gitconfig, although it’s relative to the MSys root, which is wherever you decide to install Git on your Windows system when you run the installer. If you are using version 2.x or later of Git for Windows, there is also a system-level config file at C:\Documents and Settings\All Users\Application Data\Git\config on Windows XP, and in C:\ProgramData\Git\config on Windows Vista and newer. This config file can only be changed by git config -f <file> as an admin.
Your Identity
The first thing you should do when you install Git is to set your user name and email address. This is important because every Git commit uses this information, and it’s immutably baked (lưu trữ một cách bất tận) into the commits you start creating:
$ git config --global user.name "John Doe"
$ git config --global user.email johndoe@example.comMany of the GUI tools will help you do this when you first run them.
Your Editor
Now that your identity is set up, you can configure the default text editor that will be used when Git needs you to type(nhập) in a message. If not configured, Git uses your system’s default editor.If you want to use a different text editor, such as Emacs, you can do the following:
$ git config --global core.editor emacsIn the case of Notepad++, a popular(phổ biến) programming editor, you are likely(có khả năng) to want to use the 32-bit version, since at the time of writing the 64-bit version doesn’t support all plug-ins. If you are on a 32-bit Windows system, or you have a 64-bit editor on a 64-bit system, you’ll type something like this:
$ git config --global core.editor "'C:/Program Files/Notepad++/notepad++.exe' -multiInst -nosession"If you have a 32-bit editor on a 64-bit system, the program will be installed in C:\Program Files (x86):
$ git config --global core.editor "'C:/Program Files (x86)/Notepad++/notepad++.exe' -multiInst -nosession"Note
Vim, Emacs and Notepad++ are popular text editors often used by developers on Unix-based systems like Linux and macOS or a Windows system. If you are not familiar with these editors, you may need to search for specific instructions for how to set up your favorite editor with Git.
Warning
You may find, if you don’t setup your editor like this, you get into a really confusing(khó khăn) state when Git attempts(cố gắng) to launch(khởi chạy) it. An example on a Windows system may include a prematurely terminated (kết thúc sớm) Git operation during(suốt) a Git initiated edit.
Checking Your Settings
If you want to check your configuration settings, you can use the git config --list command to list all the settings Git can find at that point:
$ git config --list
user.name=John Doe
user.email=johndoe@example.com
color.status=auto
color.branch=auto
color.interactive=auto
color.diff=auto
...
You may see keys more than once, because Git reads the same key from different files (
/etc/gitconfig and ~/.gitconfig,, for example). In this case, Git uses the last value for each unique key it sees.You can also check what Git thinks a specific key’s value is by typing git config <key>
$ git config user.name
John DoeSince (Vì) Git might read (có thể đọc) the same configuration variable value from more than one file, it’s possible(khả thi) that you have an unexpected(bất ngờ) value for one of these values and you don’t know why (không biết tại sao). In cases like that, you can query Git as to the origin(nguồn gốc) for that value, and it will tell you which configuration file had the final say in setting that value:
$ git config --show-origin rerere.autoUpdate
file:/home/johndoe/.gitconfig false
1.7 Getting Started - Getting Help
Getting Help
If you ever(khi nào) need help while using Git, there are two equivalent(tương đương) ways to get the comprehensive(toàn diện) manual page (manpage) help for any of the Git commands:
$ git help <verb>
$ man git-<verb>$ git help configIn addition (ngoài ra), if you don’t need the full-blown manpage help (Nếu bạn không cần trợ giúp man page toàn diện), but just need a quick refresher (cập nhật nhanh) on the available options (các tham số tùy chọn) for a Git command, you can ask for the more concise (rút gọn hơn) “help” output with the -h or --help options, as in:
$ git add -h
usage: git add [<options>] [--] <pathspec>...

    -n, --dry-run         dry run
    -v, --verbose         be verbose

    -i, --interactive     interactive picking
    -p, --patch           select hunks interactively
    -e, --edit            edit current diff and apply
    -f, --force           allow adding otherwise ignored files
    -u, --update          update tracked files
    -N, --intent-to-add   record only the fact that the path will be added later
    -A, --all             add changes from all tracked and untracked files
    --ignore-removal      ignore paths removed in the working tree (same as --no-all)
    --refresh             don't add, only refresh the index
    --ignore-errors       just skip files which cannot be added because of errors
    --ignore-missing      check if - even missing - files are ignored in dry run
--chmod <(+/-)x> override the executable bit of the listed filesIf you can read only one chapter to get going with Git, this is it. (Nếu bạn có thể đọc chỉ một chương để bắt đầu với Git, đây là nó.) This chapter covers(trình bày) every(tất cả) basic command you need to do the vast majority (phần lớn) of the things you’ll eventually spend (dành thời gian) your time doing with Git. By the end of the chapter, you should be able (có thể) to configure(cấu hình) and initialize(khởi tạo) a repository, begin and stop tracking files, and stage and commit changes. We’ll also show you how to set up Git to ignore(bỏ qua) certain(nhất định) files and file patterns (mẫu file), how to undo mistakes(lỗi sai) quickly and easily, how to browse the history of your project and view changes between commits, and how to push and pull from remote repositories.
Getting a Git Repository
You typically obtain a Git repository in one of two ways:Bạn thường có được kho lưu trữ Git theo một trong hai cách:
1. You can take a local directory that is currently not under version control, and turn it into a Git repository, or
Bạn có thể lấy một thư mục cục bộ hiện không nằm dưới sự kiểm soát phiên bản và biến nó thành một kho lưu trữ Git, hoặc
2. You can clone an existing Git repository from elsewhere.
Bạn có thể sao chép kho lưu trữ Git hiện có từ nơi khác.
In either case, you end up with a Git repository on your local machine, ready for work.
Trong cả hai trường hợp, bạn kết thúc với một kho lưu trữ Git trên máy cục bộ của bạn, sẵn sàng cho công việc.
Initializing a Repository in an Existing Directory
If you have a project directory that is currently not under version control and you want to start controlling it with Git, you first need to go to that project’s directory. If you’ve never done this, it looks a little different depending on which system you’re running:
Nếu bạn có một thư mục dự án hiện không được kiểm soát phiên bản và bạn muốn bắt đầu kiểm soát nó bằng Git, trước tiên bạn cần phải đi đến thư mục của dự án đó.Nếu bạn chưa bao giờ làm điều này, có vẻ hơi khác một chút tùy thuộc vào hệ thống bạn đang chạy:
for Linux:
$ cd /home/user/my_project
for Mac:
$ cd /Users/user/my_project
for Windows:
$ cd /c/user/my_project
and type:
$ git initThis creates a new subdirectory named .git that contains all of your necessary repository files — a Git repository skeleton. At this point, nothing in your project is tracked yet. (See Git Internals for more information about exactly what files are contained in the .git directory you just created.)
Điều này tạo ra một thư mục con mới có tên .git chứa tất cả các tệp kho lưu trữ cần thiết của bạn - một kho lưu trữ Git. Tại thời điểm này, không có gì trong dự án của bạn được theo dõi. (Xem Git Internals để biết thêm thông tin về chính xác những tệp nào được chứa trong thư mục .git mà bạn vừa tạo).
If you want to start version-controlling existing files (as opposed to an empty directory), you should probably begin tracking those files and do an initial commit. You can accomplish that with a few git add commands that specify the files you want to track, followed by a git commit:
Nếu bạn muốn bắt đầu phiên bản kiểm soát các tệp hiện có (trái ngược với một thư mục trống), bạn có lẽ nên bắt đầu theo dõi các tệp đó và thực hiện một cam kết ban đầu. Bạn có thể thực hiện điều đó bằng một vài lệnh git add chỉ định các tệp mà bạn muốn theo dõi, theo sau là một git commit:
$ git add *.c
$ git add LICENSE
$ git commit -m 'initial project version'Chúng ta sẽ xem xét những lệnh này chỉ trong một phút. Tại thời điểm này, bạn có một kho lưu trữ Git với các tệp được theo dõi và một cam kết ban đầu.
Cloning an Existing Repository
If you want to get a copy of an existing Git repository — for example, a project you’d like to contribute to — the command you need is git clone. If you’re familiar with other VCS systems such as Subversion, you’ll notice that the command is "clone" and not "checkout". This is an important distinction — instead of getting just a working copy, Git receives a full copy of nearly all data that the server has. Every version of every file for the history of the project is pulled down by default when you run git clone. In fact, if your server disk gets corrupted, you can often use nearly any of the clones on any client to set the server back to the state it was in when it was cloned (you may lose some server-side hooks and such, but all the versioned data would be there — see Getting Git on a Server for more details).
Nếu bạn muốn lấy một bản copy của kho lưu trữ Git đã có trước đó. Ví dụ: Dự án mà bạn muốn đóng góp. Câu lệnh bạn cần là git clone. Nếu bạn đã quen thuộc với các hệ thống VSC khác như Subversion. Bạn sẻ thấy rằng đây là lệnh CLONE chứ không phải là CHECKOUT. Đây là một sự khác biệt quan trọng. Thay vì chỉ nhận được bản sao làm việc. Git lấy một bản sao đầy đủ gần như tất cả dữ liệu mà máy chủ có. Mỗi phiên bản của mỗi tập tin cho lịch sử của dự án được kéo xuống theo mặc định khi bạn chạy git clone. Trong thực tế, nếu đĩa máy chủ của bạn bị hỏng, bạn có thể sử dụng bất kỳ bản sao nào trên bất kỳ ứng dụng khách nào để đặt máy chủ về trạng thái khi nó được nhân bản (bạn có thể mất một số móc nối phía máy chủ hoặc các data tương tự như vậy). Nhưng tất cả các version của data vẫn ở đó, xem Getting Git on a Server để xem các nội dung khác)
You clone a repository with git clone <url>. For example, if you want to clone the Git linkable(có thể liên kết) library called libgit2, you can do so like this:
$ git clone https://github.com/libgit2/libgit2Điều này tạo ra một thư mục có tên là libgit2. Khởi tạo một thư mục có tên là libgit2, khởi tạo một tên thư mục tên là .git bên trong nó, Kéo xuống tất cả dữ liệu cho kho lưu trữ đó và một bản sao làm việc của phiên bản mới nhất. Nếu bạn đi vào thư mục libgit2 vừa mới tạo, bạn sẻ thấy các tệp dự án ở trong đó, sẳn sàng làm việc hoặc được sử dụng.
If you want to clone the repository into a directory named something other than libgit2, you can specify that as the next command-line option:
$ git clone https://github.com/libgit2/libgit2 mylibgitmylibgit.Git has a number of different transfer protocols you can use. The previous example uses the https:// protocol, but you may also see git:// or user@server:path/to/repo.git, which uses the SSH transfer protocol. Getting Git on a Server will introduce all of the available options the server can set up to access your Git repository and the pros and cons of each.
Git có một số giao thức truyền khác nhau mà bạn có thể sử dụng. Ví dụ trước sử dụng giao thức https
, nhưng bạn cũng sẻ thấy git:// hoặc user@server:path/to/repo.git, chỗ khác sử dụng giao thức SSH. Getting Git on a Server sẻ giới thiệu tất cả các tùy chọn có sẳn mà máy chủ có thể thiết lập để truy cập kho lưu trữ Git của bạn và các ưu khuyết điểm của mỗi máy chủ.
2.2 Git Basics - Recording Changes to the Repository
Recording Changes to the Repository
At this point, you should have a bona fide (thật sự) Git repository on your local machine, and a checkout or working copy of all of its files in front of you. Typically(thông thường), you’ll want to start making changes and committing snapshots of those changes (những thay đổi đó) into your repository each time the project reaches(đạt tới) a state you want to record.
Remember that each file in your working directory can be in one of two states: tracked or untracked. Tracked files are files that were (có trong) in the last snapshot; they can be unmodified, modified, or staged. In short, tracked files are files that Git knows about.
Untracked files are everything else — any files in your working directory that were not in your last snapshot and are not in your staging area. When you first clone a repository, all of your files will be tracked and unmodified because Git just checked them out and you haven’t(chưa) edited anything.
As you edit files, Git sees them as modified, because you’ve changed them since your last commit. As you work, you selectively(có chọn lọc) stage these modified files and then commit all those staged changes, and the cycle repeats.
Figure 8. The lifecycle of the status of your files.
Checking the Status of Your Files
The main tool you use to determine which files are in which state is the git status command. If you run this command directly after a clone, you should see something like this:$ git status
On branch master
Your branch is up-to-date with 'origin/master'.
nothing to commit, working directory cleanLet’s say you add a new file to your project, a simple README file. If the file didn’t exist before, and you run git status, you see your untracked file like so:
$ echo 'My Project' > README
$ git status
On branch master
Your branch is up-to-date with 'origin/master'.
Untracked files:
  (use "git add <file>..." to include in what will be committed)

    README

nothing added to commit but untracked files present (use "git add" to track)Tracking New Files
In order to begin tracking a new file, you use the command git add. To begin tracking the README file, you can run this:$ git add README$ git status
On branch master
Your branch is up-to-date with 'origin/master'.
Changes to be committed:
(use "git reset HEAD <file>..." to unstage)
new file: READMEStaging Modified Files
Let’s change a file that was already tracked. If you change a previously tracked file called CONTRIBUTING.md and then run your git status command again, you get something that looks like this:$ git status
On branch master
Your branch is up-to-date with 'origin/master'.
Changes to be committed:
(use "git reset HEAD <file>..." to unstage)
new file: README
Changes not staged for commit:
(use "git add <file>..." to update what will be committed)
(use "git checkout -- <file>..." to discard changes in working directory)
modified: CONTRIBUTING.md$ git add CONTRIBUTING.md
$ git status
On branch master
Your branch is up-to-date with 'origin/master'.
Changes to be committed:
  (use "git reset HEAD <file>..." to unstage)

    new file:   README
modified: CONTRIBUTING.md$ vim CONTRIBUTING.md
$ git status
On branch master
Your branch is up-to-date with 'origin/master'.
Changes to be committed:
(use "git reset HEAD <file>..." to unstage)
new file: README
modified: CONTRIBUTING.md
Changes not staged for commit:
(use "git add <file>..." to update what will be committed)
(use "git checkout -- <file>..." to discard changes in working directory)
modified: CONTRIBUTING.md$ git add CONTRIBUTING.md
$ git status
On branch master
Your branch is up-to-date with 'origin/master'.
Changes to be committed:
(use "git reset HEAD <file>..." to unstage)
new file: README
modified: CONTRIBUTING.mdShort Status
While the git status output is pretty comprehensive (khá toàn diện), it’s also quite wordy (khá dài dòng). Git also has a short status flag so you can see your changes in a more compact way (một cách nhỏ gọn hơn). If you run git status -s or git status --short you get a far more simplified output (output đơn giản hơn nhiều) from the command:$ git status -s
M README
MM Rakefile
A lib/git.rb
M lib/simplegit.rb
?? LICENSE.txtIgnoring Files
Often, you’ll have a class of files that you don’t want Git to automatically add or even show you as being untracked. These are generally automatically generated files such as log files or files produced by your build system. In such cases, you can create a file listing patterns to match them named(có tên) .gitignore. Here is an example .gitignore file:$ cat .gitignore
*.[oa]
*~
The first line tells Git to ignore any files ending in “.o” or “.a” — object and archive files that may be the product of building your code. The second line tells Git to ignore all files whose names end with a tilde (~), which is used by many text editors such as Emacs to mark temporary files. You may also include a log, tmp, or pid directory; automatically generated documentation; and so on. Setting up a .gitignore file for your new repository before you get going (trước khi bắt đầu) is generally(thường) a good idea so you don’t accidentally(vô tình) commit files that you really don’t want in your Git repository.
The rules for the patterns you can put in the .gitignore file are as follows:
- Blank lines or lines starting with # are ignored(bỏ qua).
- Standard glob patterns work, and will be applied recursively (áp dụng đệ quy) throughout(khắp) the entire(toàn bộ) working tree.
- You can start patterns with a forward slash (/) to avoid recursivity (tránh đệ quy).
- You can end patterns with a forward slash (/) to specify a directory.
- You can negate(phủ nhận) a pattern by starting it with an exclamation point (!).
Glob patterns are like simplified(đơn giản hóa) regular expressions that shells use. An asterisk (*) matches zero or more characters; [abc] matches any character inside the brackets (in this case a, b, or c); a question mark (?) matches a single character; and brackets enclosing characters separated by a hyphen ([0-9]) matches any character between them (in this case 0 through 9). You can also use two asterisks to match nested directories; a/**/z would match a/z, a/b/z, a/b/c/z, and so on.
Here is another example .gitignore file:
# ignore all .a files
*.a
# but do track lib.a, even though you're ignoring .a files above
!lib.a
# only ignore the TODO file in the current directory, not subdir/TODO
/TODO
# ignore all files in the build/ directory
build/
# ignore doc/notes.txt, but not doc/server/arch.txt
doc/*.txt
# ignore all .pdf files in the doc/ directory and any of its subdirectories
doc/**/*.pdf
Tip
GitHub maintains(duy trì) a fairly comprehensive list of good (một danh sách khá tốt) .gitignore file examples for dozens of projects (hàng chục dự án) and languages at https://github.com/github/gitignore if you want a starting point for your project.
Note
In the simple case, a repository might(có thể) have a single .gitignore file in its root directory, which applies recursively (áp dụng đệ quy) to the entire(toàn bộ) repository. However, it is also possible(có thể) to have additional(bổ sung) .gitignore files in subdirectories. The rules in these nested(lồng nhau) .gitignore files apply only to the files under the directory where they are located. (The Linux kernel source repository has 206 .gitignore files.)
It is beyond(nằm ngoài) the scope of this book to get into the details of multiple .gitignore files; see man gitignore for the details.
Viewing Your Staged and Unstaged Changes
If the git status command is too vague(mơ hồ) for you — you want to know exactly what you changed, not just (không chỉ) which files were changed — you can use the git diff command. We’ll cover(đảm bảo) git diff in more detail later (Chúng tôi sẽ đề cập chi tiết hơn về sau này), but you’ll probably(có lẽ) use it most often to answer these two questions: What have you changed but not yet staged? And what have you staged that you are about to commit? Although(Mặc dầu) git status answers those questions very generally (rất bình thường) by listing the file names, git diff shows you the exact lines added and removed — the patch(mảnh vụn), as it were.Let’s say you edit and stage the README file again and then edit the CONTRIBUTING.md file without staging it. If you run your git status command, you once again see something like this:
$ git status
On branch master
Your branch is up-to-date with 'origin/master'.
Changes to be committed:
  (use "git reset HEAD <file>..." to unstage)

    modified:   README

Changes not staged for commit:
  (use "git add <file>..." to update what will be committed)
  (use "git checkout -- <file>..." to discard changes in working directory)

modified: CONTRIBUTING.md$ git diff
diff --git a/CONTRIBUTING.md b/CONTRIBUTING.md
index 8ebb991..643e24f 100644
--- a/CONTRIBUTING.md
+++ b/CONTRIBUTING.md
@@ -65,7 +65,8 @@ branch directly, things can get messy.
Please include a nice description of your changes when you submit your PR;
if we have to read the whole diff to figure out why you're contributing
in the first place, you're less likely to get feedback and have your change
-merged in.
+merged in. Also, split your changes into comprehensive chunks if your patch is
+longer than a dozen lines.
If you are starting to work on a particular area, feel free to submit a PR
that highlights your work in progress (and note in the PR title that it'sIf you want to see what you’ve staged that will go into your next commit, you can use git diff --staged. This command compares your staged changes to your last commit:
$ git diff --staged
diff --git a/README b/README
new file mode 100644
index 0000000..03902a1
--- /dev/null
+++ b/README
@@ -0,0 +1 @@
+My ProjectFor another example, if you stage the CONTRIBUTING.md file and then edit it, you can use git diff to see the changes in the file that are staged and the changes that are unstaged. If our environment looks like this:
$ git add CONTRIBUTING.md
$ echo '# test line' >> CONTRIBUTING.md
$ git status
On branch master
Your branch is up-to-date with 'origin/master'.
Changes to be committed:
  (use "git reset HEAD <file>..." to unstage)

    modified:   CONTRIBUTING.md

Changes not staged for commit:
  (use "git add <file>..." to update what will be committed)
  (use "git checkout -- <file>..." to discard changes in working directory)

modified: CONTRIBUTING.md$ git diff
diff --git a/CONTRIBUTING.md b/CONTRIBUTING.md
index 643e24f..87f08c8 100644
--- a/CONTRIBUTING.md
+++ b/CONTRIBUTING.md
@@ -119,3 +119,4 @@ at the
## Starter Projects
See our [projects list](https://github.com/libgit2/libgit2/blob/development/PROJECTS.md).
+# test line$ git diff --cached
diff --git a/CONTRIBUTING.md b/CONTRIBUTING.md
index 8ebb991..643e24f 100644
--- a/CONTRIBUTING.md
+++ b/CONTRIBUTING.md
@@ -65,7 +65,8 @@ branch directly, things can get messy.
Please include a nice description of your changes when you submit your PR;
if we have to read the whole diff to figure out why you're contributing
in the first place, you're less likely to get feedback and have your change
-merged in.
+merged in. Also, split your changes into comprehensive chunks if your patch is
+longer than a dozen lines.
If you are starting to work on a particular area, feel free to submit a PR
that highlights your work in progress (and note in the PR title that it'sGit Diff in an External Tool
We will continue to use the git diff command in various ways (nhiều cách khác nhau) throughout(trong suốt) the rest(phần còn lại) of the book. There is another way to look at these diffs if you prefer(thích) a graphical(đồ họa) or external diff viewing program instead (chương trình so sánh bên ngoài). If you run git difftool instead of git diff, you can view any of these diffs in software like emerge, vimdiff and many more (including commercial(thương mại) products). Run git difftool --tool-help to see what is available on your system.
Committing Your Changes
Now that your staging area is set up the way you want it, you can commit your changes. Remember that anything that is still unstaged — any files you have created or modified that you haven’t run git add on since you edited them — won’t go into this commit (sẻ không đi vào commit này). They will stay as modified files(chúng sẻ ở dạng modified files) on your disk. In this case, let’s say that the last time(lần cuối) you ran git status, you saw that everything was staged, so you’re ready(sẵn sàng) to commit your changes. The simplest way to commit is to type git commit:$ git commitThe editor displays the following text (this example is a Vim screen):
# Please enter the commit message for your changes. Lines starting
# with '#' will be ignored, and an empty message aborts the commit.
# On branch master
# Your branch is up-to-date with 'origin/master'.
#
# Changes to be committed:
# new file:   README
# modified:   CONTRIBUTING.md
#
~
~
~
".git/COMMIT_EDITMSG" 9L, 283CAlternatively(Cách khác), you can type your commit message inline with the commit command by specifying(chỉ định) it after a -m flag, like this:
$ git commit -m "Story 182: Fix benchmarks for speed"
[master 463dc4f] Story 182: Fix benchmarks for speed
2 files changed, 2 insertions(+)
create mode 100644 README
Now you’ve created your first commit! You can see that the commit has given you some output about itself: which branch you committed to (master), what SHA-1 checksum the commit has (463dc4f), how many files were changed, and statistics about lines added and removed in the commit.
Remember that the commit records the snapshot you set up in your staging area. Anything you didn’t stage is still sitting there modified (Vẫn đang ở trạng thái modified); you can do another commit to add it to your history. Every time you perform a commit, you’re recording a snapshot of your project that you can revert to or compare to later.
Skipping the Staging Area
Although it can be amazingly useful (hữu ích đáng kinh ngạc) for crafting commits exactly how you want them, the staging area is sometimes a bit more complex than (phức tạp hơn) you need in your workflow. If you want to skip the staging area, Git provides(cung cấp) a simple shortcut. Adding the -a option to the git commit command makes Git automatically stage every file that is already tracked before doing the commit, letting you skip (cho phép bạn bỏ qua) the git add part:$ git status
On branch master
Your branch is up-to-date with 'origin/master'.
Changes not staged for commit:
(use "git add <file>..." to update what will be committed)
(use "git checkout -- <file>..." to discard changes in working directory)
modified: CONTRIBUTING.md
no changes added to commit (use "git add" and/or "git commit -a")
$ git commit -a -m 'added new benchmarks'
[master 83e38c7] added new benchmarks
1 file changed, 5 insertions(+), 0 deletions(-)Notice (để ý) how you don’t have to run git add on the CONTRIBUTING.md file in this case before you commit. That’s because the -a flag includes all changed files. This is convenient (tiện lợi), but be careful(cẩn thận); sometimes this flag will cause you to include unwanted changes.
Removing Files
To remove a file from Git, you have to remove it from your tracked files (more accurately (chính xác hơn), remove it from your staging area) and then commit. The git rm command does that, and also removes the file from your working directory so you don’t see it as an untracked file the next time around.If you simply remove the file from your working directory, it shows up under the “Changes not staged for commit” (that is, unstaged) area of your git status output:
$ rm PROJECTS.md
$ git status
On branch master
Your branch is up-to-date with 'origin/master'.
Changes not staged for commit:
  (use "git add/rm <file>..." to update what will be committed)
  (use "git checkout -- <file>..." to discard changes in working directory)

        deleted:    PROJECTS.md

no changes added to commit (use "git add" and/or "git commit -a")
Then, if you run git rm, it stages the file’s removal:
$ git rm PROJECTS.md
rm 'PROJECTS.md'
$ git status
On branch master
Your branch is up-to-date with 'origin/master'.
Changes to be committed:
  (use "git reset HEAD <file>..." to unstage)

deleted: PROJECTS.mdAnother useful thing you may want to do is to keep the file in your working tree but remove it from your staging area. In other words, you may want to keep the file on your hard drive but not have Git track it anymore. This is particularly(đặc biệt) useful if you forgot to add something to your .gitignore file and accidentally(vô tình) staged it, like a large log file or a bunch of .a compiled files. To do this, use the --cached option:
$ git rm --cached README$ git rm log/\*.log$ git rm log/\*.logMoving Files
Unlike many other VCS systems, Git doesn’t explicitly track (không theo dõi rõ ràng) file movement. If you rename a file in Git, no metadata is stored in Git that tells it you renamed the file. However, Git is pretty smart (khá thông minh) about figuring(điều đó) that out after the fact(thực tế) — we’ll deal(thỏa thuận) with detecting file movement a bit later (một chút sau đó).Thus it’s a bit confusing (có một chút bối rối) that Git has a mv command. If you want to rename a file in Git, you can run something like:
$ git mv file_from file_to$ git mv README.md README
$ git status
On branch master
Your branch is up-to-date with 'origin/master'.
Changes to be committed:
(use "git reset HEAD <file>..." to unstage)
renamed: README.md -> README$ mv README.md README
$ git rm README.md
$ git add README2.3 Git Basics - Viewing the Commit History
Viewing the Commit History
After you have created several(một số) commits, or if you have cloned a repository with an existing commit history, you’ll probably(có lẽ) want to look back to see what has happened (chuyện gì đã xãy ra). The most basic and powerful tool to do this is the git log command.These examples use a very simple project called “simplegit”. To get the project, run
$ git clone https://github.com/schacon/simplegit-progit$ git log
commit ca82a6dff817ec66f44342007202690a93763949
Author: Scott Chacon <schacon@gee-mail.com>
Date: Mon Mar 17 21:52:11 2008 -0700
changed the version number
commit 085bb3bcb608e1e8451d4b2432f8ecbe6306e7e7
Author: Scott Chacon <schacon@gee-mail.com>
Date: Sat Mar 15 16:40:33 2008 -0700
removed unnecessary test
commit a11bef06a3f659402fe7563abf99ad00de2209e6
Author: Scott Chacon <schacon@gee-mail.com>
Date: Sat Mar 15 10:31:28 2008 -0700
first commitA huge(lớn) number and variety(đa dạng) of options to the git log command are available to show you exactly what you’re looking for. Here, we’ll show you some of the most popular(phổ biến).
One of the more helpful options is -p or --patch, which shows the difference (the patch output) introduced(giới thiệu) in each commit. You can also limit the number of log entries(mục) displayed, such as using -2 to show only the last two entries.
$ git log -p -2
commit ca82a6dff817ec66f44342007202690a93763949
Author: Scott Chacon <schacon@gee-mail.com>
Date:   Mon Mar 17 21:52:11 2008 -0700

    changed the version number

diff --git a/Rakefile b/Rakefile
index a874b73..8f94139 100644
--- a/Rakefile
+++ b/Rakefile
@@ -5,7 +5,7 @@ require 'rake/gempackagetask'
 spec = Gem::Specification.new do |s|
     s.platform  =   Gem::Platform::RUBY
     s.name      =   "simplegit"
-    s.version   =   "0.1.0"
+    s.version   =   "0.1.1"
     s.author    =   "Scott Chacon"
     s.email     =   "schacon@gee-mail.com"
     s.summary   =   "A simple gem for using Git in Ruby code."

commit 085bb3bcb608e1e8451d4b2432f8ecbe6306e7e7
Author: Scott Chacon <schacon@gee-mail.com>
Date:   Sat Mar 15 16:40:33 2008 -0700

    removed unnecessary test

diff --git a/lib/simplegit.rb b/lib/simplegit.rb
index a0a60ae..47c6340 100644
--- a/lib/simplegit.rb
+++ b/lib/simplegit.rb
@@ -18,8 +18,3 @@ class SimpleGit
     end

 end
-
-if $0 == __FILE__
-  git = SimpleGit.new
-  puts git.show
-end$ git log --stat
commit ca82a6dff817ec66f44342007202690a93763949
Author: Scott Chacon <schacon@gee-mail.com>
Date: Mon Mar 17 21:52:11 2008 -0700
changed the version number
Rakefile | 2 +-
1 file changed, 1 insertion(+), 1 deletion(-)
commit 085bb3bcb608e1e8451d4b2432f8ecbe6306e7e7
Author: Scott Chacon <schacon@gee-mail.com>
Date: Sat Mar 15 16:40:33 2008 -0700
removed unnecessary test
lib/simplegit.rb | 5 -----
1 file changed, 5 deletions(-)
commit a11bef06a3f659402fe7563abf99ad00de2209e6
Author: Scott Chacon <schacon@gee-mail.com>
Date: Sat Mar 15 10:31:28 2008 -0700
first commit
README | 6 ++++++
Rakefile | 23 +++++++++++++++++++++++
lib/simplegit.rb | 25 +++++++++++++++++++++++++
3 files changed, 54 insertions(+)Another really useful option is --pretty. This option changes the log output to formats other than the default. A few prebuilt(dựn sẵn) options are available for you to use. The oneline option prints each commit on a single line, which is useful if you’re looking at a lot of commits. In addition, the short, full, and fuller options show the output in roughly(gần như) the same format but with less or more information, respectively(tương ứng):
$ git log --pretty=oneline
ca82a6dff817ec66f44342007202690a93763949 changed the version number
085bb3bcb608e1e8451d4b2432f8ecbe6306e7e7 removed unnecessary test
a11bef06a3f659402fe7563abf99ad00de2209e6 first commit$ git log --pretty=format:"%h - %an, %ar : %s"
ca82a6d - Scott Chacon, 6 years ago : changed the version number
085bb3b - Scott Chacon, 6 years ago : removed unnecessary test
a11bef0 - Scott Chacon, 6 years ago : first commit| Option | Description of Output |
|---|---|
%H |
Commit hash
|
%h |
Abbreviated commit hash
|
%T |
Tree hash
|
%t |
Abbreviated tree hash
|
%P |
Parent hashes
|
%p |
Abbreviated parent hashes
|
%an |
Author name
|
%ae |
Author email
|
%ad |
Author date (format respects the --date=option)
|
%ar |
Author date, relative
|
%cn |
Committer name
|
%ce |
Committer email
|
%cd |
Committer date
|
%cr |
Committer date, relative
|
%s |
Subject
|
You may be wondering(tự hỏi) what the difference is between author and committer. The author is the person who originally wrote the work, whereas(trong khi) the committer is the person who last applied the work. So, if you send in a patch to a project and one of the core members applies the patch, both of you get credit — you as the author, and the core member as the committer. We’ll cover this distinction(phân biệt) a bit more in Distributed Git.
The oneline and format options are particularly(đặc biệt) useful with another log option called --graph. This option adds a nice little ASCII graph showing your branch and merge history:
$ git log --pretty=format:"%h %s" --graph
* 2d3acf9 ignore errors from SIGCHLD on trap
*  5e3ee11 Merge branch 'master' of git://github.com/dustin/grit
|\
| * 420eac9 Added a method for getting the current branch.
* | 30e367c timeout code and tests
* | 5a09431 add timeout protection to grit
* | e1193f8 support for heads with slashes in them
|/
* d6016bc require time for xmlschema
* 11d191e Merge branch 'defunkt' into localThose are only some simple output-formatting options to git log — there are many more. Common options to git log lists the options we’ve covered so far (chúng tôi đã đề cập đến giờ), as well as (cũng như) some other common formatting options that may be useful, along with how they change the output of the log command.
Table 2. Common options to git log
Option Description
-p
Show the patch introduced with each commit.
--stat
Show statistics for files modified in each commit.
--shortstat
Display only the changed/insertions/deletions line from the --stat command.
--name-only
Show the list of files modified after the commit information.
--name-status
Show the list of files affected with added/modified/deleted information as well.
--abbrev-commit
Show only the first few characters of the SHA-1 checksum instead of all 40.
--relative-date
Display the date in a relative format (for example, “2 weeks ago”) instead of using the full date format.
--graph
Display an ASCII graph of the branch and merge history beside the log output.
--pretty
Show commits in an alternate format. Options include oneline, short, full, fuller, and format (where you specify your own format).
--oneline
Shorthand for --pretty=oneline --abbrev-commit used together.
Limiting Log Output
In addition to output-formatting options, git log takes a number of useful limiting options — that is, options that let you show only a subset of commits. You’ve seen one such option already — the -2 option, which displays only the last two commits. In fact, you can do -<n>, where n is any integer to show the last n commits. In reality, you’re unlikely to use that often, because Git by default pipes all output through a pager so you see only one page of log output at a time.
However, the time-limiting options such as --since and --until are very useful. For example, this command gets the list of commits made in the last two weeks:
$ git log --since=2.weeks
This command works with lots of formats — you can specify a specific date like "2008-01-15", or a relative date such as "2 years 1 day 3 minutes ago".
You can also filter the list to commits that match some search criteria. The --author option allows you to filter on a specific author, and the --grep option lets you search for keywords in the commit messages.
Note
You can specify more than one instance of both the --author and --grep search criteria, which will limit the commit output to commits that match any of the --author patterns and any of the --grep patterns; however, adding the --all-match option further limits the output to just those commits that match all --grep patterns.
Another really helpful filter is the -S option (colloquially referred to as Git’s “pickaxe” option), which takes a string and shows only those commits that changed the number of occurrences of that string. For instance, if you wanted to find the last commit that added or removed a reference to a specific function, you could call:
$ git log -S function_name
The last really useful option to pass to git log as a filter is a path. If you specify a directory or file name, you can limit the log output to commits that introduced a change to those files. This is always the last option and is generally preceded by double dashes (--) to separate the paths from the options.
In Options to limit the output of git log we’ll list these and a few other common options for your reference.
Table 3. Options to limit the output of git log
Option Description
-<n>
Show only the last n commits
--since, --after
Limit the commits to those made after the specified date.
--until, --before
Limit the commits to those made before the specified date.
--author
Only show commits in which the author entry matches the specified string.
--committer
Only show commits in which the committer entry matches the specified string.
--grep
Only show commits with a commit message containing the string
-S
Only show commits adding or removing code matching the string
For example, if you want to see which commits modifying test files in the Git source code history were committed by Junio Hamano in the month of October 2008 and are not merge commits, you can run something like this:
$ git log --pretty="%h - %s" --author=gitster --since="2008-10-01" \
--before="2008-11-01" --no-merges -- t/
5610e3b - Fix testcase failure when extended attributes are in use
acd3b9e - Enhance hold_lock_file_for_{update,append}() API
f563754 - demonstrate breakage of detached checkout with symbolic link HEAD
d1a43f2 - reset --hard/read-tree --reset -u: remove unmerged new paths
51a94af - Fix "checkout --track -b newbranch" on detached HEAD
b0ad11e - pull: allow "git pull origin $something:$current_branch" into an unborn branch
Of the nearly 40,000 commits in the Git source code history, this command shows the 6 that match those criteria.
Tip
Preventing the display of merge commits
Depending on the workflow used in your repository, it’s possible that a sizable percentage of the commits in your log history are just merge commits, which typically aren’t very informative. To prevent the display of merge commits cluttering up your log history, simply add the log option --no-merges.
sdfsdf
Không có nhận xét nào:
Đăng nhận xét