3.1 Git Branching - Branches in a Nutshell
Nearly every VCS (gần như mọi ) has some form of branching support (đều có hình thức hỗ trợ phân nhánh). Branching means you diverge from the main line (phân kì từ dòng phát triển chính) of development and continue to do work without messing (mà không gây rối) with that main line. In many VCS tools, this is a somewhat expensive process (xử lý khá tốn kém), often requiring you to create a new copy of your source code directory, which can take a long time (mất nhiều thời gian) for large projects.
Some people refer (một số người đề cập) to Git’s branching model as its “killer feature,” (tính năng sát thủ của nó) and it certainly sets Git apart in the VCS community (và nó chắc chắn đặt nằm ngoài cộng đồng VCS). Why is it so special? (tại sao nó lại đặc biệt ?) The way Git branches is incredibly lightweight (cực kì nhẹ), making branching operations nearly instantaneous (làm cho hoạt động phân nhánh gần như tức thòi), and switching back and forth between branches generally just as fast (và việc chuyển đổi qua lại giữa các phân nhánh thường nhanh). Unlike many other VCSs, Git encourages(khuyến khích) workflows that branch and merge often (quy trình làm việc với phân nhánh và hợp nhất thườn xuyên), even multiple times in a day (thậm chí nhiều lần trong một ngày). Understanding and mastering this feature gives you a powerful and unique tool and can entirely change the way that you develop. (Hiểu và làm chủ tính năng này cung cấp cho bạn một công cụ mạnh mẽ và độc đáo và hoàn toàn có thể thay đổi cách bạn phát triển.)
As you may remember from Getting Started, Git doesn’t store data as a series of changesets or differences, but instead as a series of snapshots (thay vào đó là một loạt ảnh chụp nhanh).
When you make a commit, Git stores a commit object that contains a pointer to the snapshot of the content you staged. This object also contains the author’s name and email address, the message that you typed, and pointers to the commit or commits that directly came before this commit (its parent or parents): zero parents for the initial commit (không có commit cha đối với commit khởi tạo), one parent for a normal commit, and multiple parents for a commit that results from a merge of two or more branches.
To visualize(trực quan) this, let’s assume (hãy giả sử) that you have a directory containing three files, and you stage them all and commit. Staging the files computes a checksum for each one (the SHA-1 hash we mentioned (đã đề cập) in Getting Started), stores that version of the file in the Git repository (Git refers to them as blobs), and adds that checksum to the staging area:
Your Git repository now contains five objects: three blobs (each representing(đại diện) the contents of one of the three files), one tree that lists the contents of the directory and specifies which file names are stored as which blobs, and one commit with the pointer to that root tree and all the commit metadata.
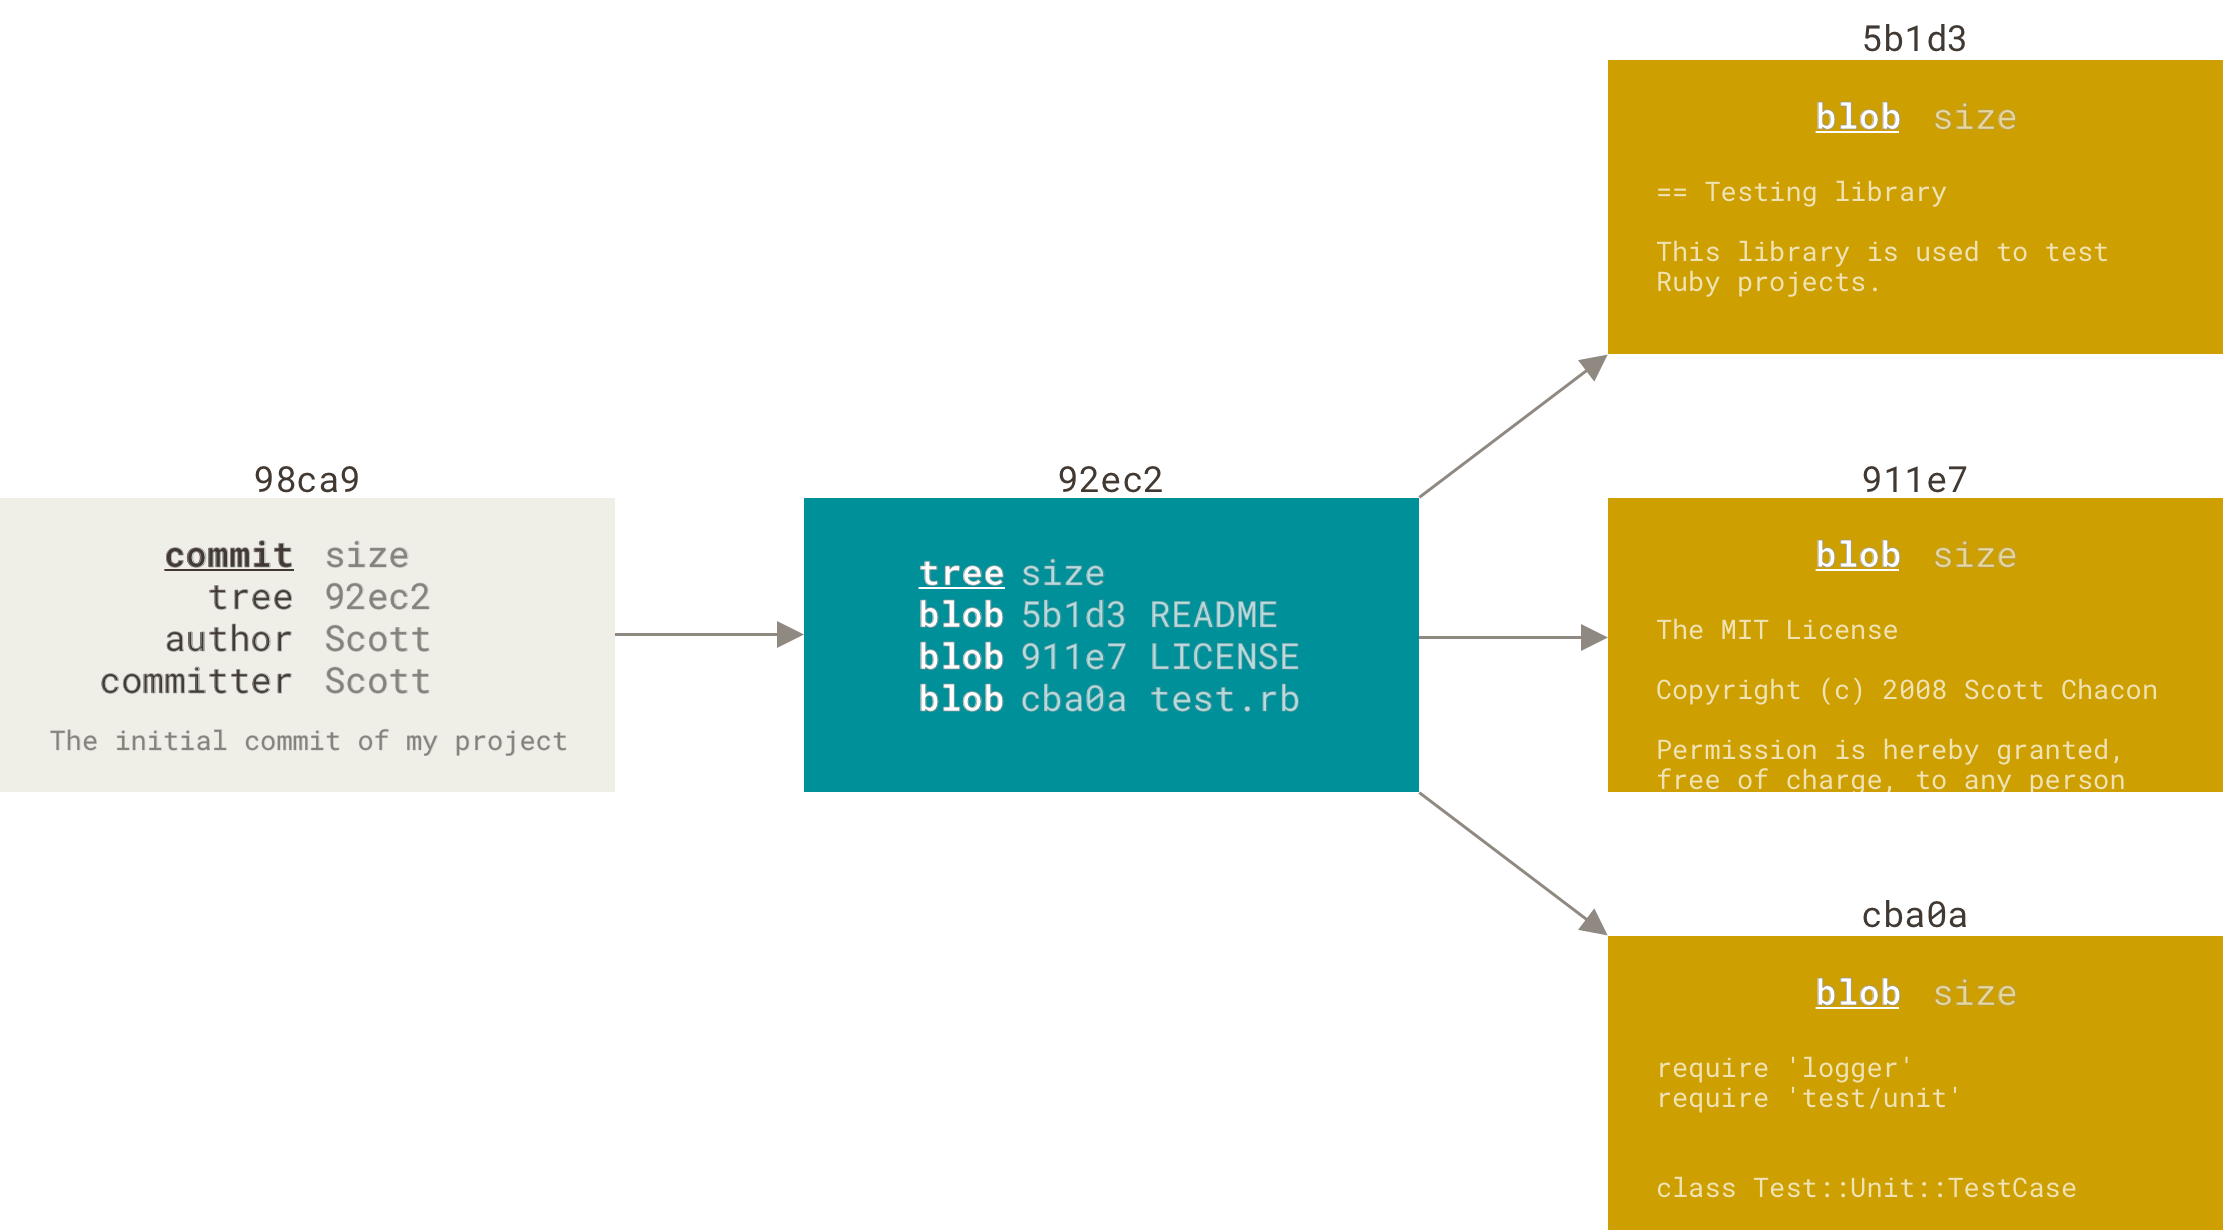
Figure 9. A commit and its tree
If you make some changes and commit again, the next commit stores a pointer to the commit that came immediately before it ( lưu trữ một con trỏ đến cam kết xuất hiện ngay trước nó.).
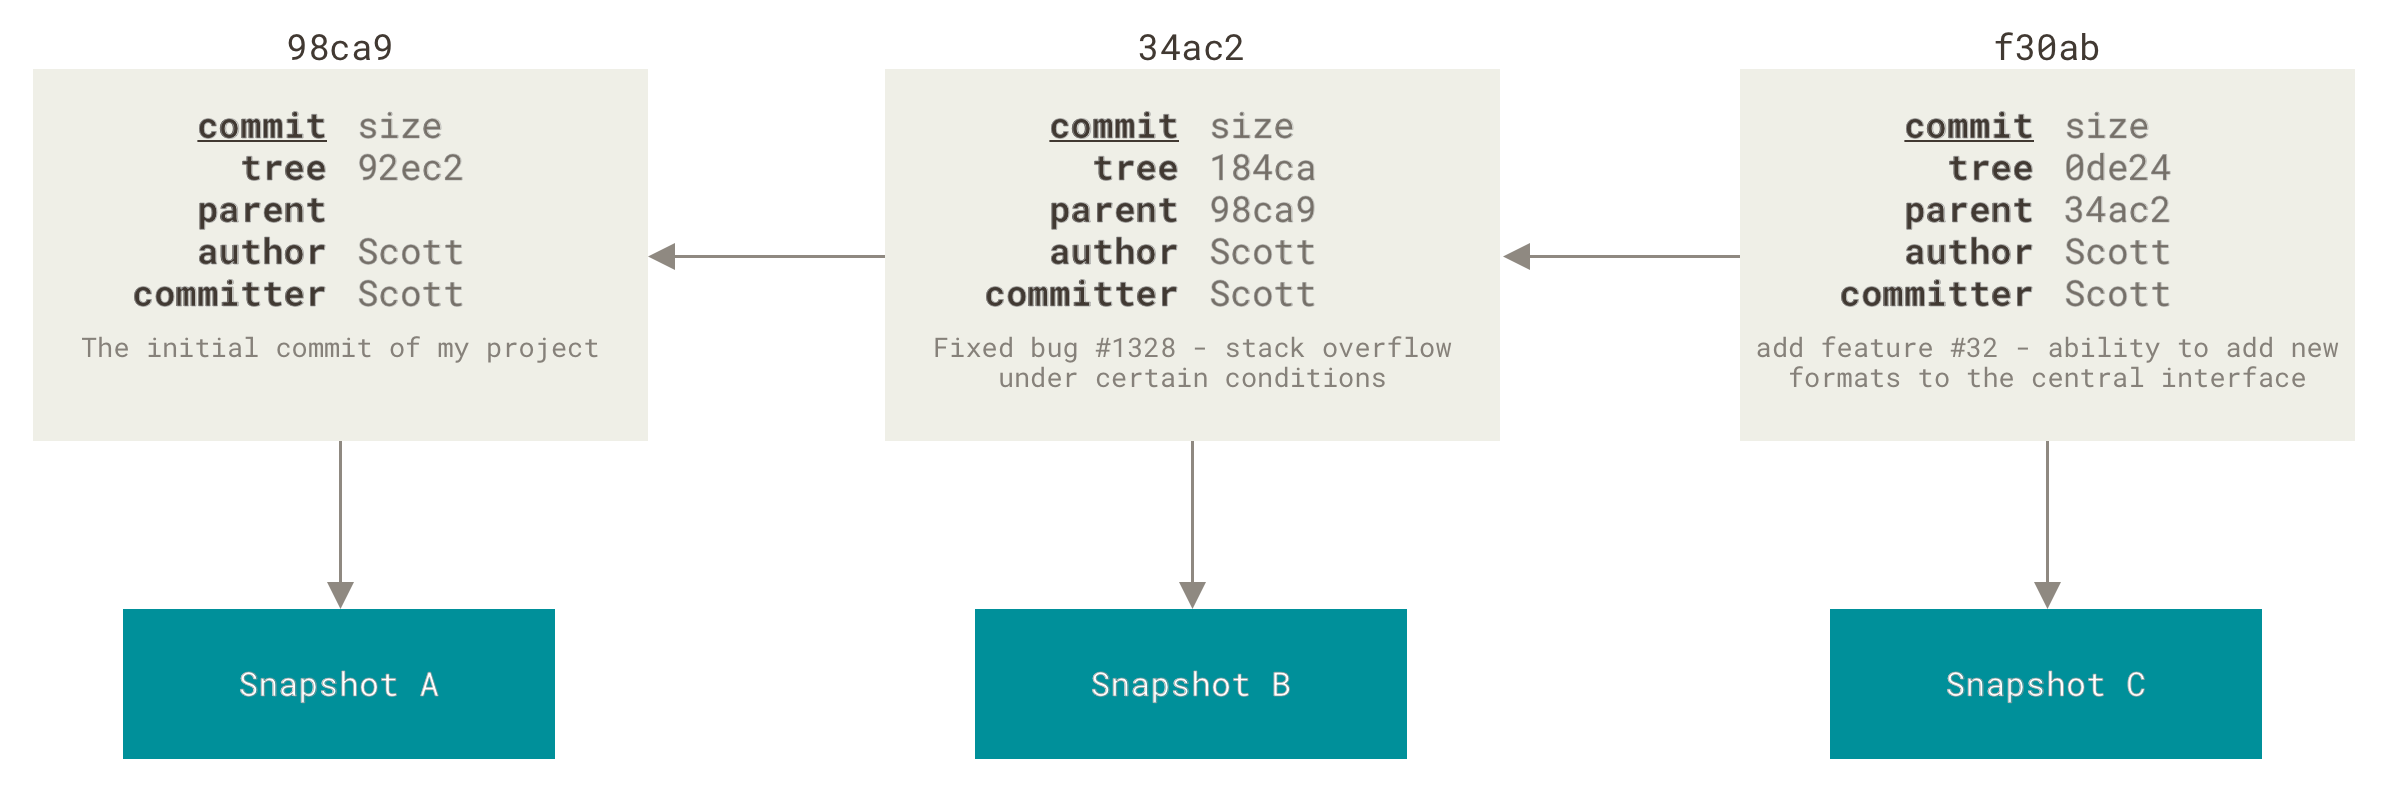
Figure 10. Commits and their parents
A branch in Git is simply a lightweight movable pointer to one of these commits (Một nhánh trong Git chỉ đơn giản là một con trỏ di chuyển nhẹ đến một trong những commit này). The default branch name in Git is master. As you start making commits, you’re given (được cấp) a master branch that points to the last commit you made. Every time you commit, the master branch pointer moves forward automatically (con trỏ nhánh chính sẻ tự động được chuyển tiếp).
Note
The “master” branch in Git is not a special branch. It is exactly like any other branch. The only reason nearly every repository (lý do duy nhất gần như tất cả các kho lưu trữ) has one is that the git init command creates it by default and most people don’t bother (không bận tâm) to change it.
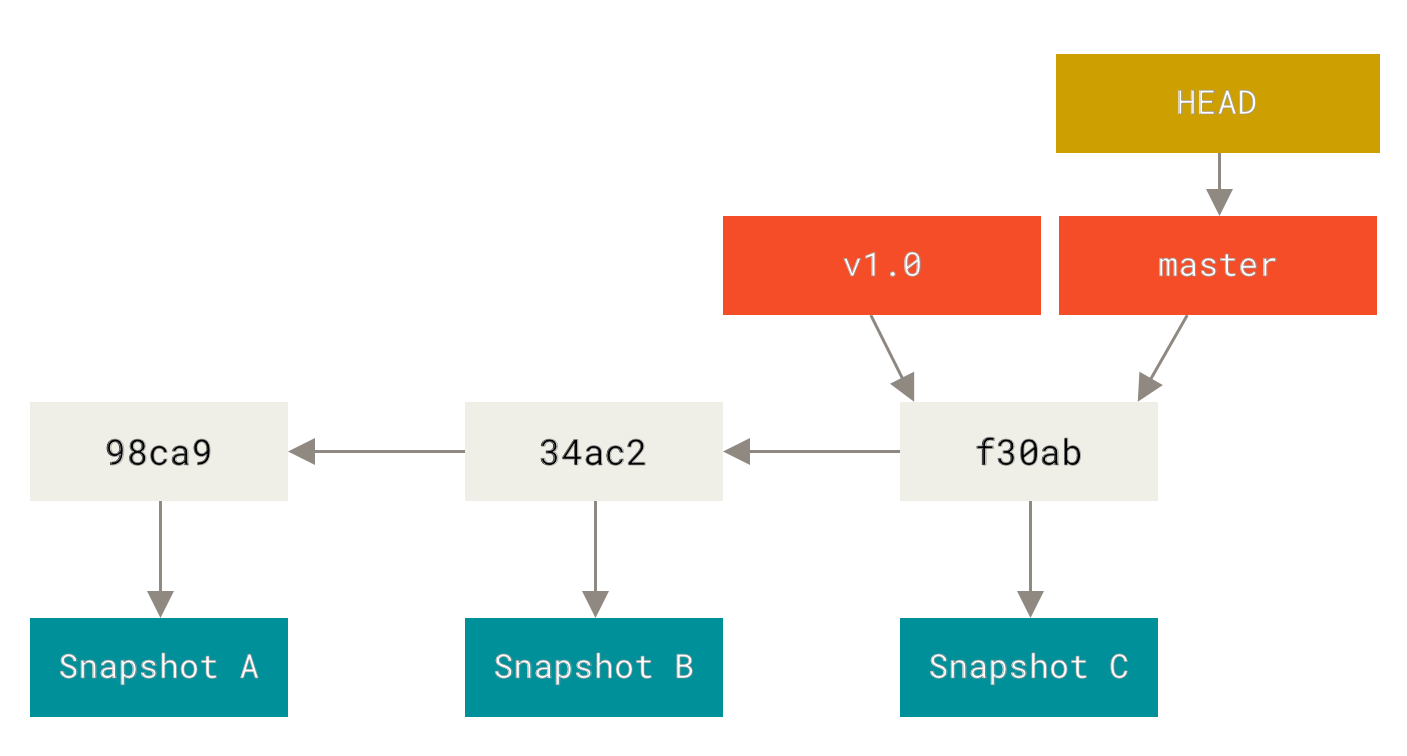
Figure 11. A branch and its commit history
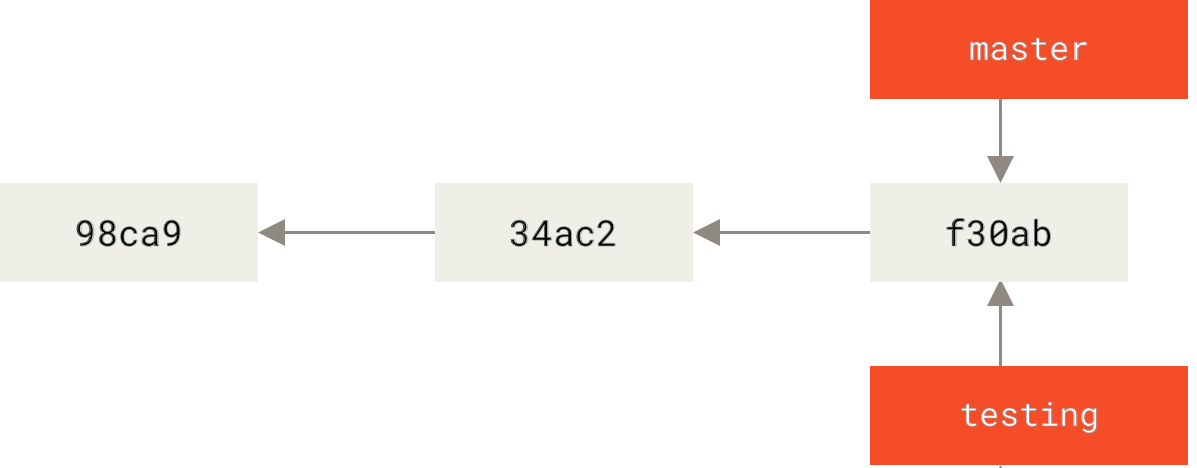
Figure 12. Two branches pointing into the same series of commits
How does Git know what branch you’re currently on? (Làm thế nào để Git biết bạn hiện đang làm chi nhánh nào?) It keeps a special pointer called HEAD (Nó giữ một con trỏ đặc biệt gọi là HEAD.). Note that this is a lot different than (khác nhiều) the concept (so với) of HEAD in other VCSs you may be used to, such as Subversion or CVS. In Git, this is a pointer to the local branch you’re currently on (hiện đang truy cập). In this case, you’re still on master (bạn vẫn đang ở nhanh master). The git branch command only created a new branch — it didn’t switch to that branch.
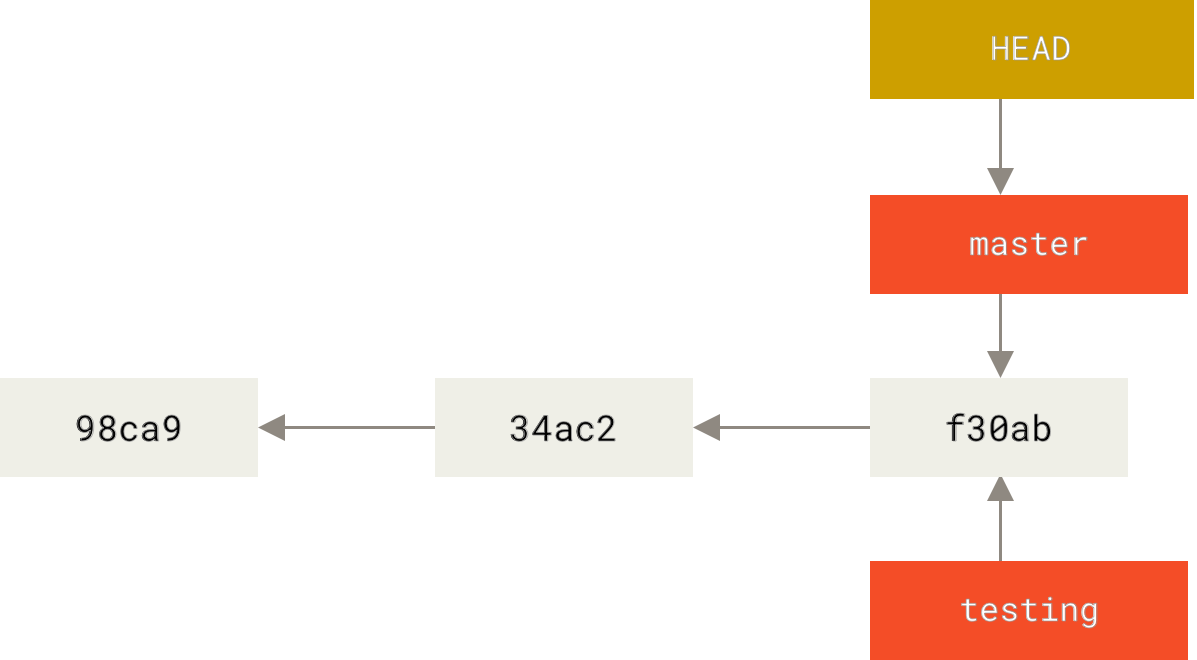
Figure 13. HEAD pointing to a branch
You can easily see this by running a simple git log command that shows you where the branch pointers are pointing (nơi con trỏ nhánh đang trỏ). This option is called --decorate.
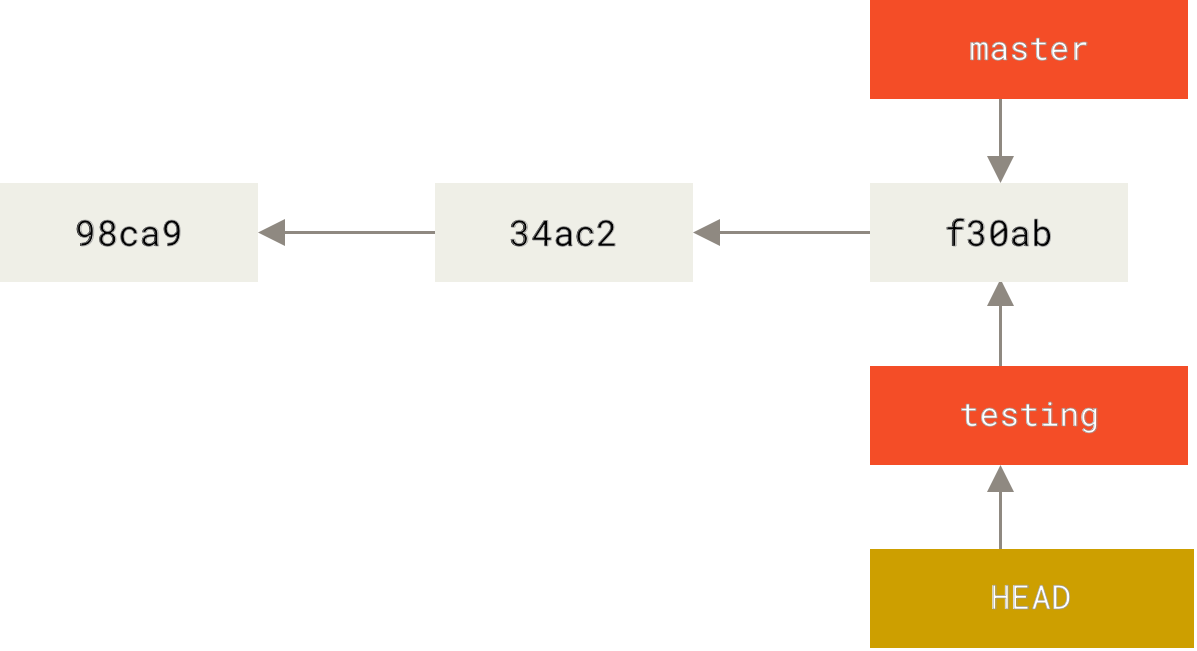
Figure 14. HEAD points to the current branch
What is the significance of that? Well, let’s do another commit (Ý nghĩa của điều đó là gì? Vâng, hãy thực hiện một cam kết khác:):
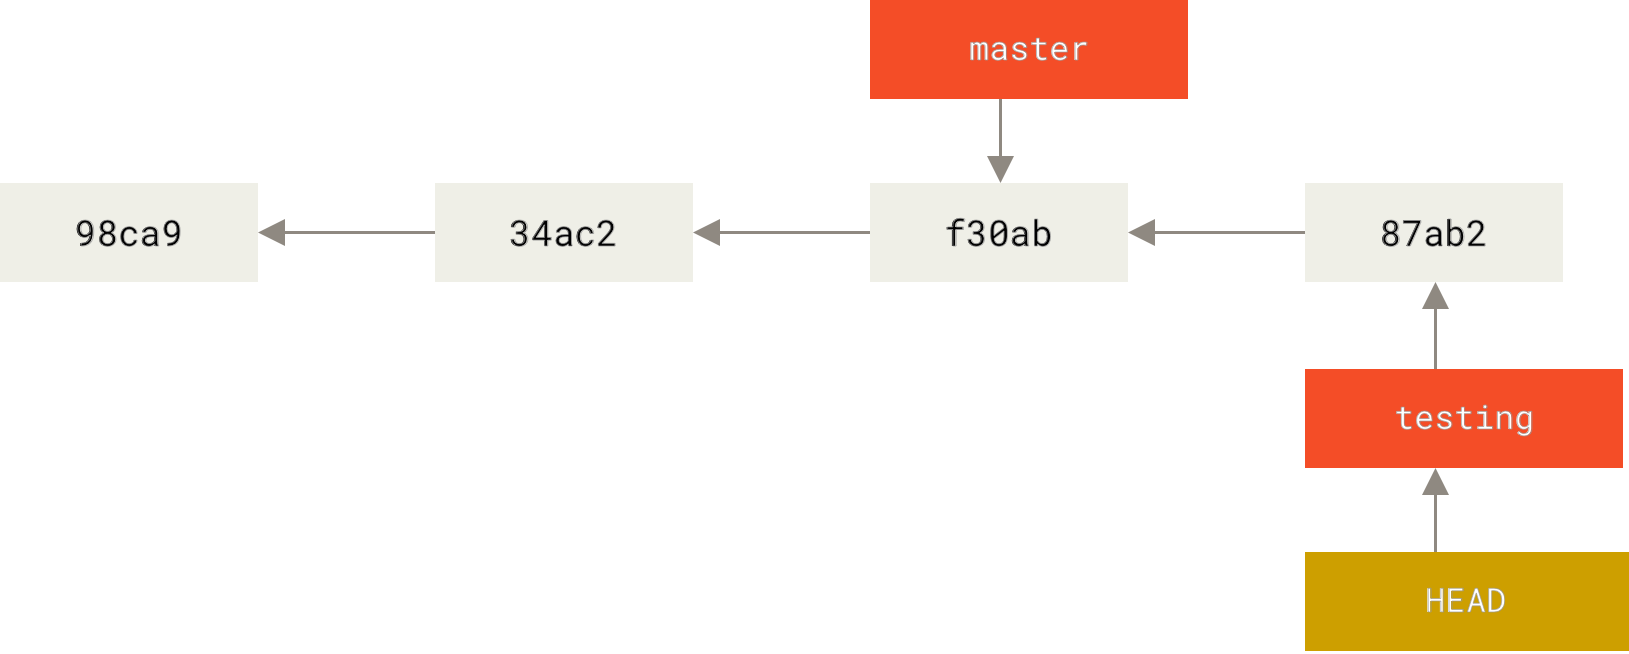
Figure 15. The HEAD branch moves forward when a commit is made
This is interesting (hấp dẫn), because now your testing branch has moved forward (đã tiến lên phía trước), but your master branch still points to (vẫn trỏ đến) the commit you were on when you ran git checkout to switch branches. Let’s switch back to the master branch:
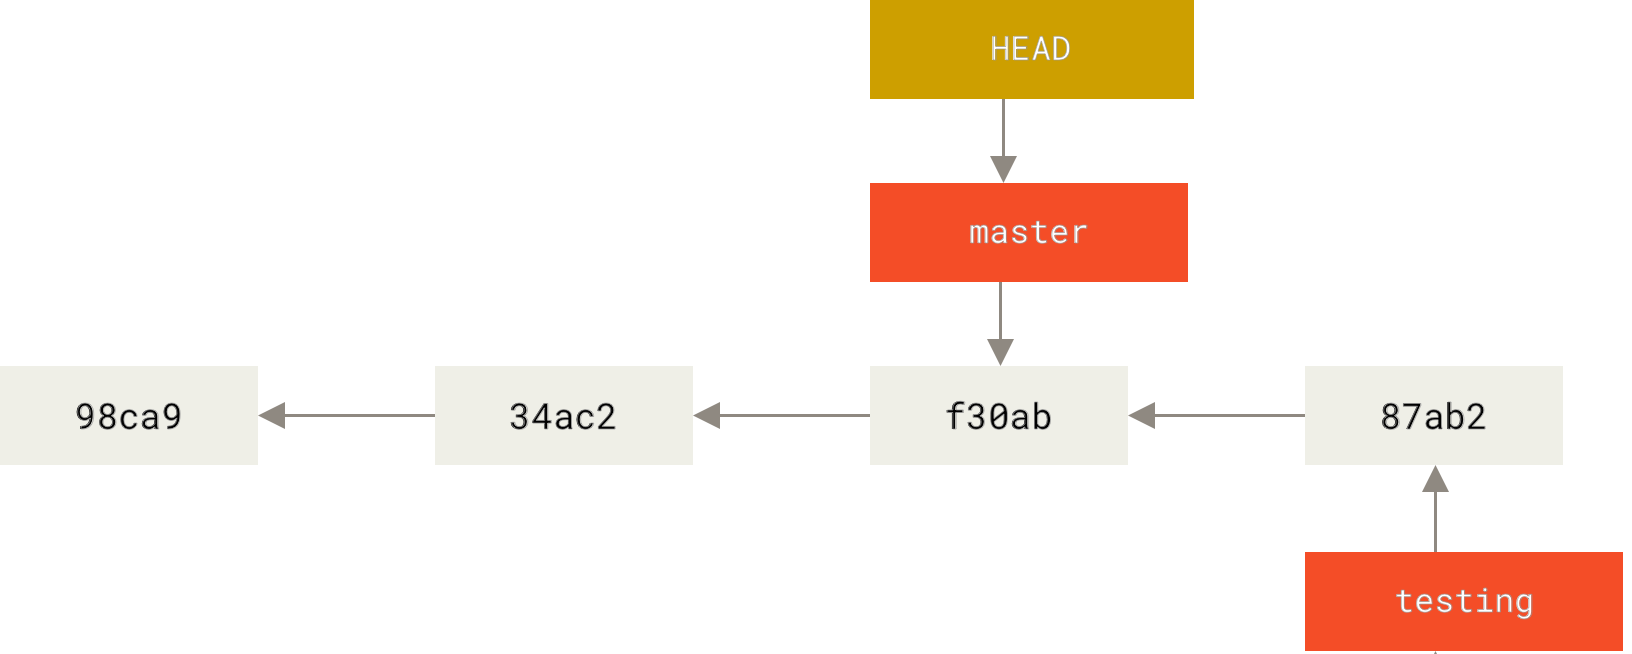
Figure 16. HEAD moves when you checkout
That command did two things. It moved the HEAD pointer back to point to the master branch, and it reverted (hoàn nguyên) the files in your working directory back to the snapshot that master points to. This also means the changes you make from this point forward (những thay đổi bạn thực hiện ở thời điểm này trở đi) will diverge(phân rã) from an older version of the project. It essentially rewinds (về cơ bản nó sẻ tua lại) the work you’ve done in your testing branch so you can go in a different direction (để bạn đi theo một hướng khác).
Note
Switching branches changes files in your working directory
It’s important to note that when you switch branches in Git, files in your working directory will change. If you switch to an older branch, your working directory will be reverted(hoàn nguyên) to look like it did the last time you committed on that branch. If Git cannot do it cleanly (Nếu git không thể làm sạch nó), it will not let you switch at all (Git sẻ không cho phép bạn chuyển nhánh).
Let’s make a few changes and commit again:
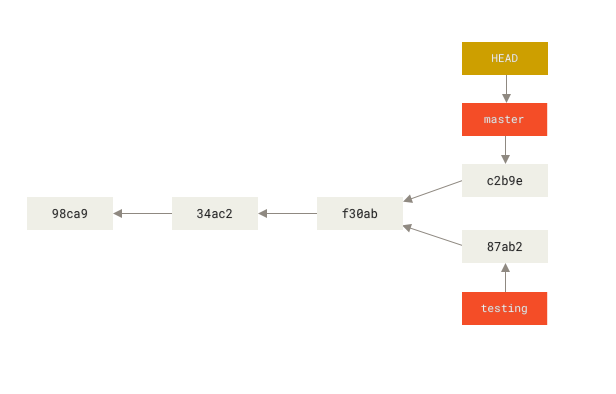
Figure 17. Divergent history
You can also see this easily with the git log command. If you run git log --oneline --decorate --graph --all it will print out the history of your commits, showing where your branch pointers are and how your history has diverged(phân kỳ).
This is in sharp contrast (điều này tương phản rõ ràng) to the way most older VCS tools branch (cách mà hầu hết các VCS tools rẻ nhánh), which involves copying all of the project’s files into a second directory (bao gồm việc sao chép tất cả các tệp dự án vào thư mục thứ hai). This can take several seconds or even minutes (mất vài giây hoặc thậm chí vài phút), depending(tùy thuộc) on the size of the project, whereas(trong) in Git the process is always instantaneous(luôn tức thời). Also, because we’re recording (ngoài ra bởi vì chúng tôi đã ghi lại) the parents when we commit, finding a proper merge base (một cơ sở hợp nhất thích hợp) for merging is automatically done for us (tự động thực hiện cho chúng ta) and is generally(nói chung là) very easy to do. These features help encourage (tính năng này giúp khuyến khích) developers to create and use branches often(thường xuyên).
Let’s see why you should do so(Hãy xem tại sao bạn nên làm như vậy.).
Some people refer (một số người đề cập) to Git’s branching model as its “killer feature,” (tính năng sát thủ của nó) and it certainly sets Git apart in the VCS community (và nó chắc chắn đặt nằm ngoài cộng đồng VCS). Why is it so special? (tại sao nó lại đặc biệt ?) The way Git branches is incredibly lightweight (cực kì nhẹ), making branching operations nearly instantaneous (làm cho hoạt động phân nhánh gần như tức thòi), and switching back and forth between branches generally just as fast (và việc chuyển đổi qua lại giữa các phân nhánh thường nhanh). Unlike many other VCSs, Git encourages(khuyến khích) workflows that branch and merge often (quy trình làm việc với phân nhánh và hợp nhất thườn xuyên), even multiple times in a day (thậm chí nhiều lần trong một ngày). Understanding and mastering this feature gives you a powerful and unique tool and can entirely change the way that you develop. (Hiểu và làm chủ tính năng này cung cấp cho bạn một công cụ mạnh mẽ và độc đáo và hoàn toàn có thể thay đổi cách bạn phát triển.)
Branches in a Nutshell
To really understand the way Git does branching, we need to take a step back and examine (lùi lại một bước và kiểm tra) how Git stores its data.As you may remember from Getting Started, Git doesn’t store data as a series of changesets or differences, but instead as a series of snapshots (thay vào đó là một loạt ảnh chụp nhanh).
When you make a commit, Git stores a commit object that contains a pointer to the snapshot of the content you staged. This object also contains the author’s name and email address, the message that you typed, and pointers to the commit or commits that directly came before this commit (its parent or parents): zero parents for the initial commit (không có commit cha đối với commit khởi tạo), one parent for a normal commit, and multiple parents for a commit that results from a merge of two or more branches.
To visualize(trực quan) this, let’s assume (hãy giả sử) that you have a directory containing three files, and you stage them all and commit. Staging the files computes a checksum for each one (the SHA-1 hash we mentioned (đã đề cập) in Getting Started), stores that version of the file in the Git repository (Git refers to them as blobs), and adds that checksum to the staging area:
$ git add README test.rb LICENSE
$ git commit -m 'The initial commit of my project'Your Git repository now contains five objects: three blobs (each representing(đại diện) the contents of one of the three files), one tree that lists the contents of the directory and specifies which file names are stored as which blobs, and one commit with the pointer to that root tree and all the commit metadata.
Figure 9. A commit and its tree
If you make some changes and commit again, the next commit stores a pointer to the commit that came immediately before it ( lưu trữ một con trỏ đến cam kết xuất hiện ngay trước nó.).
Figure 10. Commits and their parents
A branch in Git is simply a lightweight movable pointer to one of these commits (Một nhánh trong Git chỉ đơn giản là một con trỏ di chuyển nhẹ đến một trong những commit này). The default branch name in Git is master. As you start making commits, you’re given (được cấp) a master branch that points to the last commit you made. Every time you commit, the master branch pointer moves forward automatically (con trỏ nhánh chính sẻ tự động được chuyển tiếp).
Note
The “master” branch in Git is not a special branch. It is exactly like any other branch. The only reason nearly every repository (lý do duy nhất gần như tất cả các kho lưu trữ) has one is that the git init command creates it by default and most people don’t bother (không bận tâm) to change it.
Figure 11. A branch and its commit history
Creating a New Branch
What happens if you create a new branch? Well, doing so creates a new pointer for you to move around. Let’s say you want to create a new branch called testing. You do this with the git branch command:$ git branch testingFigure 12. Two branches pointing into the same series of commits
How does Git know what branch you’re currently on? (Làm thế nào để Git biết bạn hiện đang làm chi nhánh nào?) It keeps a special pointer called HEAD (Nó giữ một con trỏ đặc biệt gọi là HEAD.). Note that this is a lot different than (khác nhiều) the concept (so với) of HEAD in other VCSs you may be used to, such as Subversion or CVS. In Git, this is a pointer to the local branch you’re currently on (hiện đang truy cập). In this case, you’re still on master (bạn vẫn đang ở nhanh master). The git branch command only created a new branch — it didn’t switch to that branch.
Figure 13. HEAD pointing to a branch
You can easily see this by running a simple git log command that shows you where the branch pointers are pointing (nơi con trỏ nhánh đang trỏ). This option is called --decorate.
$ git log --oneline --decorate
f30ab (HEAD -> master, testing) add feature #32 - ability to add new formats to the central interface
34ac2 Fixed bug #1328 - stack overflow under certain conditions
98ca9 The initial commit of my projectSwitching Branches
To switch to an existing branch, you run the git checkout command. Let’s switch to the new testing branch:$ git checkout testingFigure 14. HEAD points to the current branch
What is the significance of that? Well, let’s do another commit (Ý nghĩa của điều đó là gì? Vâng, hãy thực hiện một cam kết khác:):
$ vim test.rb
$ git commit -a -m 'made a change'
Figure 15. The HEAD branch moves forward when a commit is made
This is interesting (hấp dẫn), because now your testing branch has moved forward (đã tiến lên phía trước), but your master branch still points to (vẫn trỏ đến) the commit you were on when you ran git checkout to switch branches. Let’s switch back to the master branch:
$ git checkout masterFigure 16. HEAD moves when you checkout
That command did two things. It moved the HEAD pointer back to point to the master branch, and it reverted (hoàn nguyên) the files in your working directory back to the snapshot that master points to. This also means the changes you make from this point forward (những thay đổi bạn thực hiện ở thời điểm này trở đi) will diverge(phân rã) from an older version of the project. It essentially rewinds (về cơ bản nó sẻ tua lại) the work you’ve done in your testing branch so you can go in a different direction (để bạn đi theo một hướng khác).
Note
Switching branches changes files in your working directory
It’s important to note that when you switch branches in Git, files in your working directory will change. If you switch to an older branch, your working directory will be reverted(hoàn nguyên) to look like it did the last time you committed on that branch. If Git cannot do it cleanly (Nếu git không thể làm sạch nó), it will not let you switch at all (Git sẻ không cho phép bạn chuyển nhánh).
Let’s make a few changes and commit again:
$ vim test.rb
$ git commit -a -m 'made other changes'Figure 17. Divergent history
You can also see this easily with the git log command. If you run git log --oneline --decorate --graph --all it will print out the history of your commits, showing where your branch pointers are and how your history has diverged(phân kỳ).
$ git log --oneline --decorate --graph --all
* c2b9e (HEAD, master) made other changes
| * 87ab2 (testing) made a change
|/
* f30ab add feature #32 - ability to add new formats to the
* 34ac2 fixed bug #1328 - stack overflow under certain conditions
* 98ca9 initial commit of my projectThis is in sharp contrast (điều này tương phản rõ ràng) to the way most older VCS tools branch (cách mà hầu hết các VCS tools rẻ nhánh), which involves copying all of the project’s files into a second directory (bao gồm việc sao chép tất cả các tệp dự án vào thư mục thứ hai). This can take several seconds or even minutes (mất vài giây hoặc thậm chí vài phút), depending(tùy thuộc) on the size of the project, whereas(trong) in Git the process is always instantaneous(luôn tức thời). Also, because we’re recording (ngoài ra bởi vì chúng tôi đã ghi lại) the parents when we commit, finding a proper merge base (một cơ sở hợp nhất thích hợp) for merging is automatically done for us (tự động thực hiện cho chúng ta) and is generally(nói chung là) very easy to do. These features help encourage (tính năng này giúp khuyến khích) developers to create and use branches often(thường xuyên).
Let’s see why you should do so(Hãy xem tại sao bạn nên làm như vậy.).
3.2 Git Branching - Basic Branching and Merging
Basic Branching and Merging
Let’s go through (xem qua) a simple example of branching and merging with a workflow that you might use in the real world (bạn có thể sử dụng trong thế giới thực). You’ll follow these steps (Bạn sẽ thực hiện theo các bước sau:):
1. Do some work on a website. (Làm một số công việc trên một webside)
2.Create a branch for a new story you’re working on.(Tạo nhánh cho một câu chuyện mới mà bạn đang làm việc.)
3. Do some work in that branch. (Làm một số công việc cho nhánh đó)
At this stage(giai đoạn), you’ll receive(nhận được) a call that another issue is critical (một cái gọi là vấn đề khác rất quan trọng) and you need a hotfix. You’ll do the following:
1.Switch to your production branch (Phân nhánh sản xuất).
2.Create a branch to add the hotfix.
3.After it’s tested, merge the hotfix branch, and push to production (đẩy để sản xuất).
4.Switch back to your original story (chuyển về nhánh gốc) and continue working.
Basic Branching
First(trướ tiên), let’s say you’re working (giả sử bạn đang làm việc) on your project and have a couple (có một vài) of commits already on the master branch.
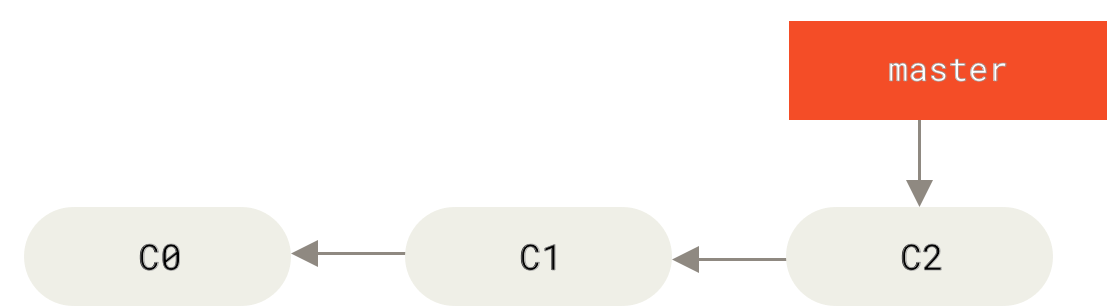
Figure 18. A simple commit history
You’ve decided that (bạn quyết định rằng) you’re going to work on issue #53 in whatever issue-tracking system (bất kỳ hệ thống theo dõi issue) your company uses. To create a new branch and switch to it at the same time, you can run the git checkout command with the -b switch:
$ git checkout -b iss53
Switched to a new branch "iss53"
This is shorthand for:
$ git branch iss53
$ git checkout iss53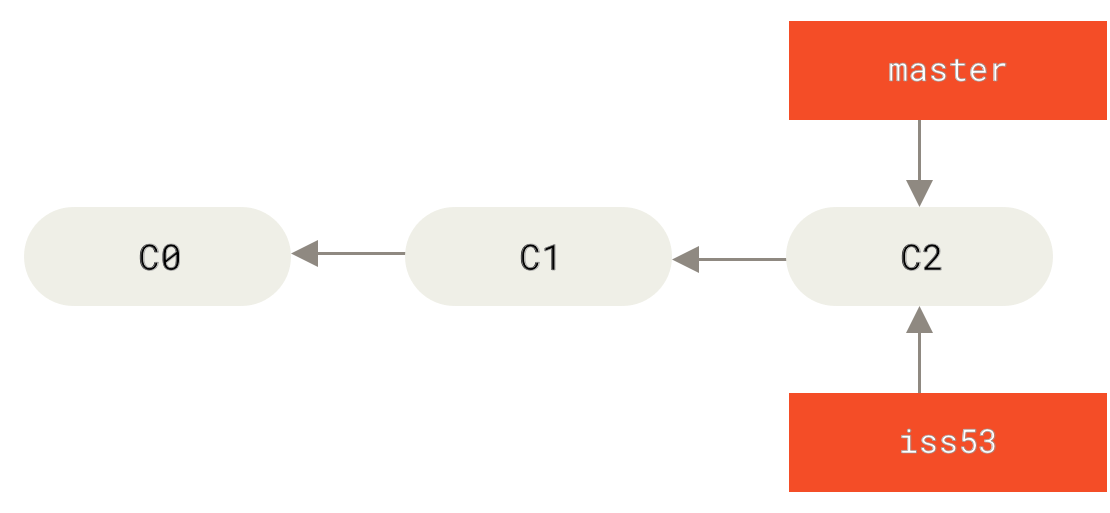
Figure 19. Creating a new branch pointer
You work on your website and do some commits. Doing so moves the iss53 branch forward (Làm như vậy là di chuyển nhánh iss53 về phía trước), because you have it checked out (that is, your HEAD is pointing(trỏ tới) to it):
$ vim index.html
$ git commit -a -m 'added a new footer [issue 53]'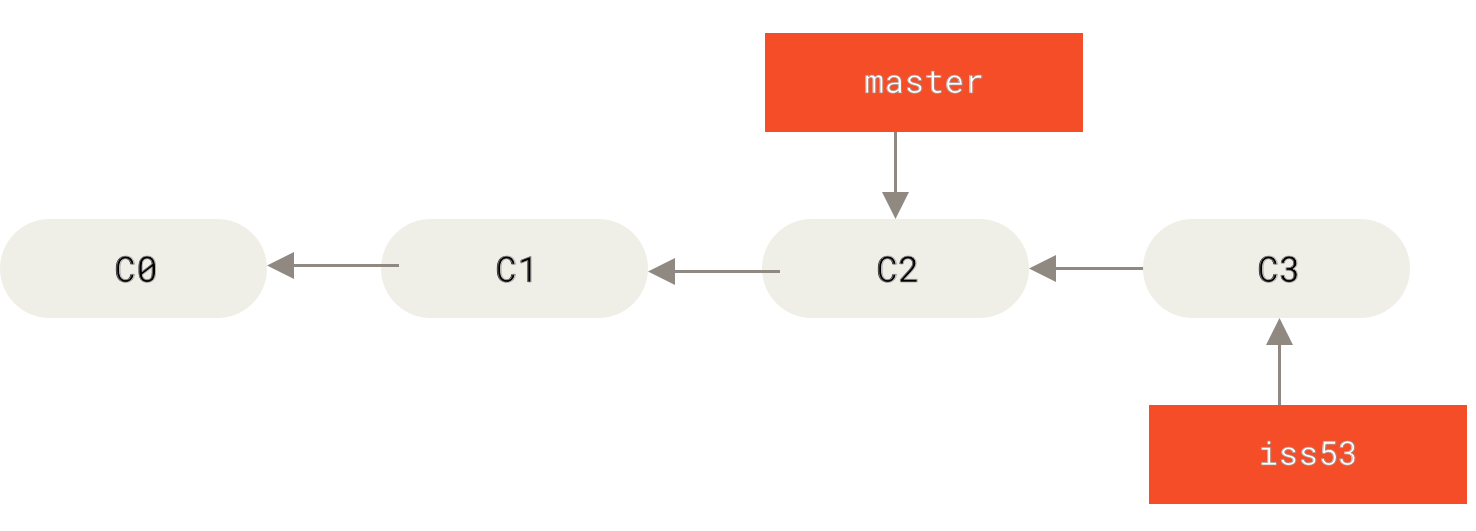
Figure 20. The iss53 branch has moved forward with your work
Now you get the call (nhận được cuộc gọi) that there is an issue with the website, and you need to fix it immediately(ngay lập tức). With Git, you don’t have to deploy your fix along with the iss53 changes you’ve made (bạn không phải triển khai bản sửa lỗi cùng với các thay đổi iss53 mà bạn đã thực hiện), and you don’t have to put a lot of effort (không cần nỗ lực nhiều) into reverting(hoàn nguyên) those changes before you can work on applying your fix to what is in production. All you have to do is (tất cả những gì bạn có thể làm là) switch back (di chuyển về) to your master branch.
However, before you do that (tuy nhiên , trước khi bạn làm điều đó), note that (lưu ý rằng) if your working directory or staging area has uncommitted (chưa được commit) changes that conflict with the branch you’re checking out (xung đột với nhánh mà bạn đang check out), Git won’t let you switch branches (Git sẻ không cho phép bạn chuyển nhánh). It’s best to have a clean working state (Tốt nhất nên có làm sạch workspace) when you switch branches. There are ways to get around this (có nhiều cách để giải quyết vấn đề này) (namely, stashing and commit amending) that we’ll cover later on (mà chúng tôi đề cập sau), in Stashing and Cleaning. For now, let’s assume you’ve (giả sử bạn đã) committed all your changes, so you can switch back to your master branch:
$ git checkout master
Switched to branch 'master'
At this point, your project working directory is exactly the way (nhánh chính xác) it was before you started working on issue #53 (trước khi bạn bắt đầu làm việc với issue 53), and you can concentrate(tập trung) on your hotfix. This is an important point to remember: when you switch branches, Git resets your working directory to look like it did the last time you committed on that branch (Git đặt lại thư mục làm việc của bạn để nó giống như lần cuối cùng bạn commit trên nhánh này). It adds, removes, and modifies files automatically to make sure your working copy is what the branch looked like on your last commit to it.
Next, you have a hotfix to make (bạn có một hotfix để thực hiện). Let’s create a hotfix branch on which to work until it’s completed (Hãy tạo mọt nhánh hotfix đẻ làm việc cho đến khi hoàn thành):
$ git checkout -b hotfix
Switched to a new branch 'hotfix'
$ vim index.html
$ git commit -a -m 'fixed the broken email address'
[hotfix 1fb7853] fixed the broken email address
 1 file changed, 2 insertions(+)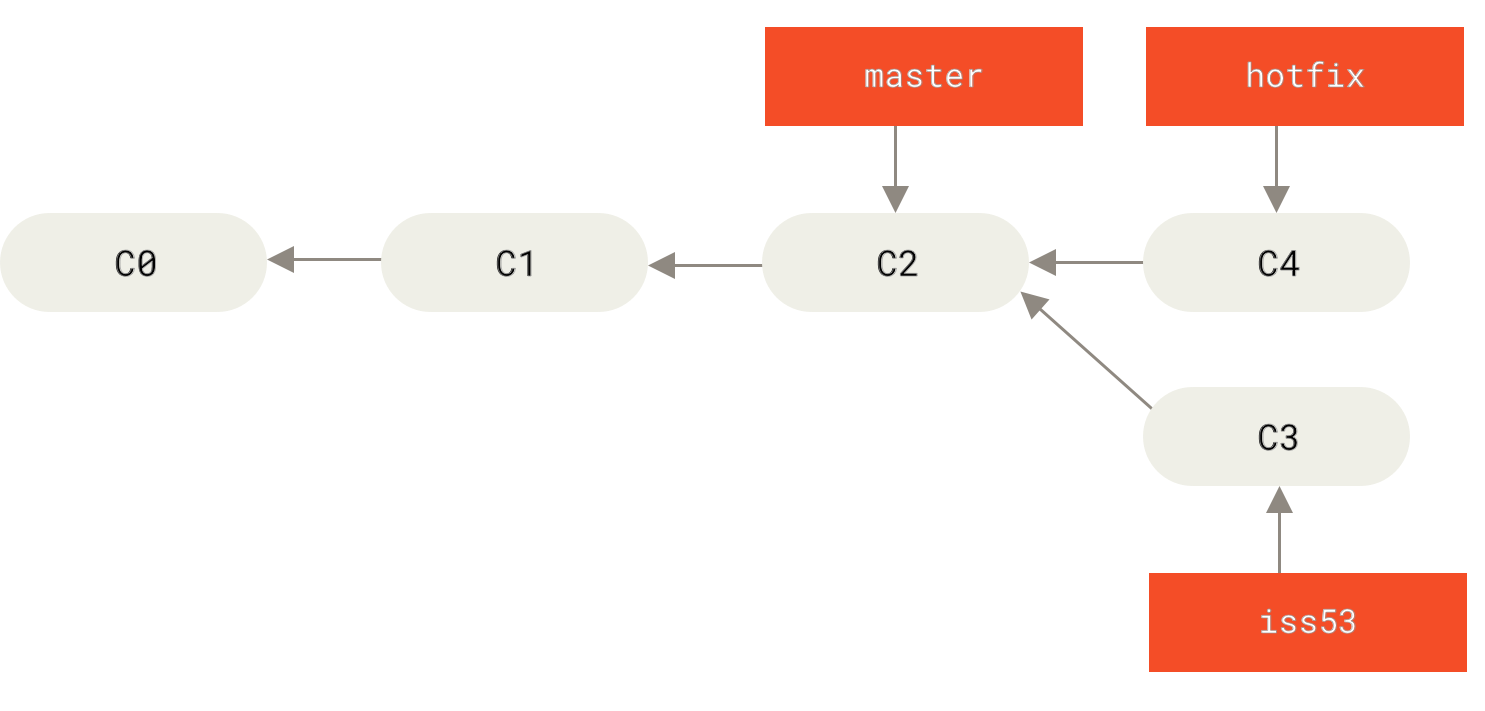
Figure 21. Hotfix branch based on master
You can run your tests, make sure the hotfix is what you want (hãy chắc chắn rằng hotfix là những gì bạn muốn), and finally(cuối cùng) merge the hotfix branch back into your master branch to deploy(triển khai) to production. You do this with the git merge command:
$ git checkout master
$ git merge hotfix
Updating f42c576..3a0874c
Fast-forward
 index.html | 2 ++
 1 file changed, 2 insertions(+)
You’ll notice(để ý) the phrase (cụm từ) “fast-forward” in that merge. Because the commit C4 pointed to by the branch hotfix you merged (đã hợp nhất) in was directly ahead (trực tiếp kết nối) of the commit C2 you’re on (bạn đang truy cập), Git simply moves the pointer forward (di chuyển con trỏ về phía trước). To phrase that another way (Theo một cách khác), when you try to merge one commit with a commit that can be reached (có thể đạt được) by following the first commit’s history (bằng cách theo dòng lịch sử của commit đầu), Git simplifies things (Git đơn giản hóa mọi thứ) by moving the pointer forward (di chuyển con trỏ về phía trước) because there is no divergent work to merge together (không có phân rã công việc để hợp nhất với nhau) — this is called a “fast-forward.”
Your change is now in the snapshot of the commit pointed to by the master branch, and you can deploy the fix.
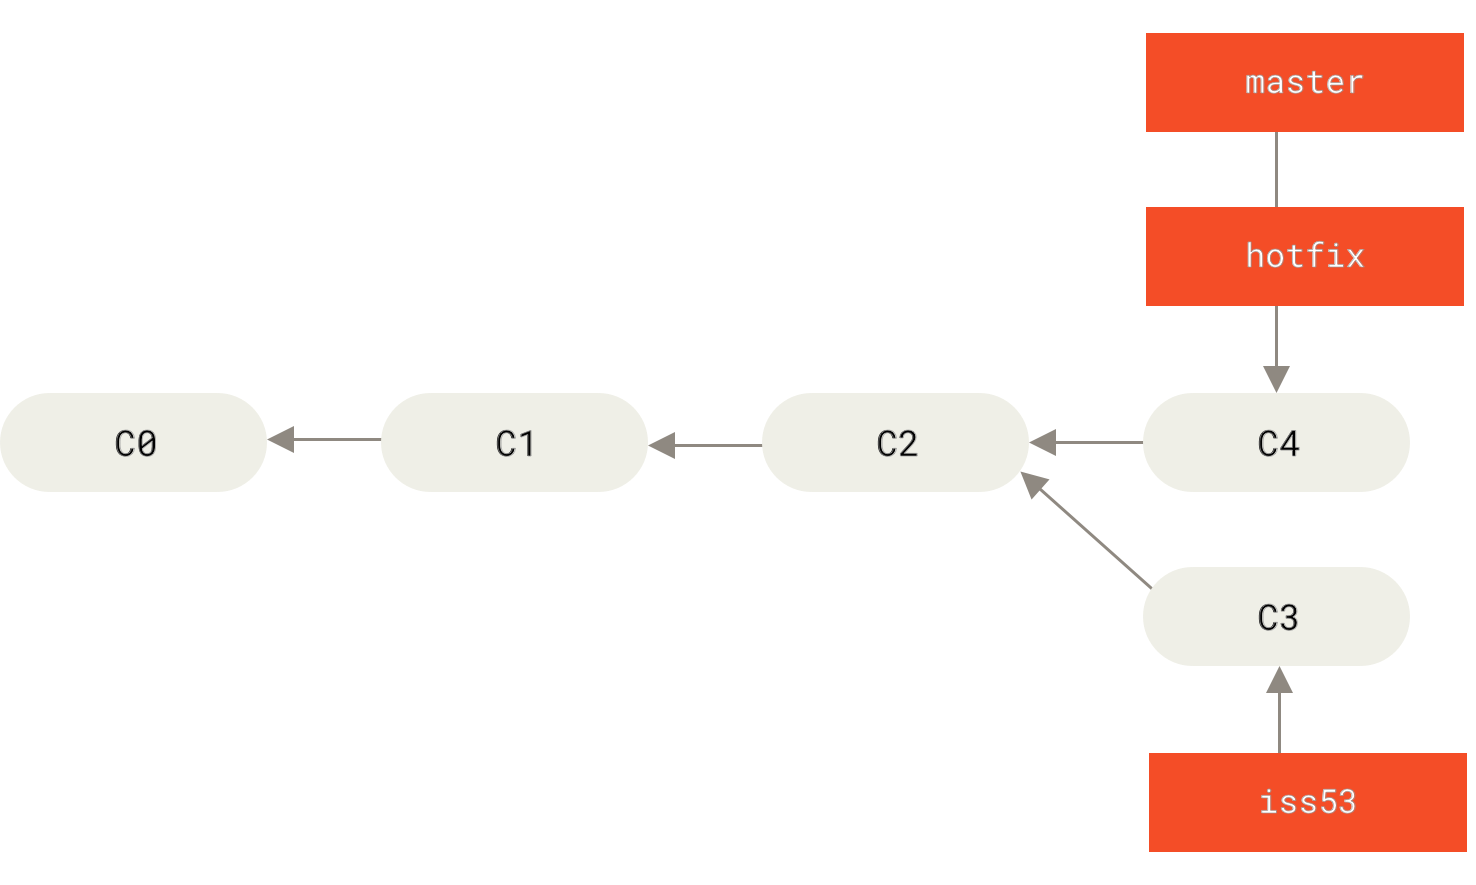
Figure 22. master is fast-forwarded to hotfix
After your super-important fix is deployed (phần fix quan trọng của bạn đã được triển khai), you’re ready to switch back (trỏ về) to the work you were doing before you were interrupted (công việc bạn đang làm trước khi bạn bị gián đoạn). However(tuy nhiên), first you’ll delete the hotfix branch, because you no longer need it (không cần nó nữa) — the master branch points at the same place (trỏ đến cùng vị trí). You can delete it with the -d option to git branc:
$ git branch -d hotfix
Deleted branch hotfix (3a0874c).
Now you can switch back to your work-in-progress branch on issue #53 and continue working on it.
$ git checkout iss53
Switched to branch "iss53"
$ vim index.html
$ git commit -a -m 'finished the new footer [issue 53]'
[iss53 ad82d7a] finished the new footer [issue 53]
1 file changed, 1 insertion(+)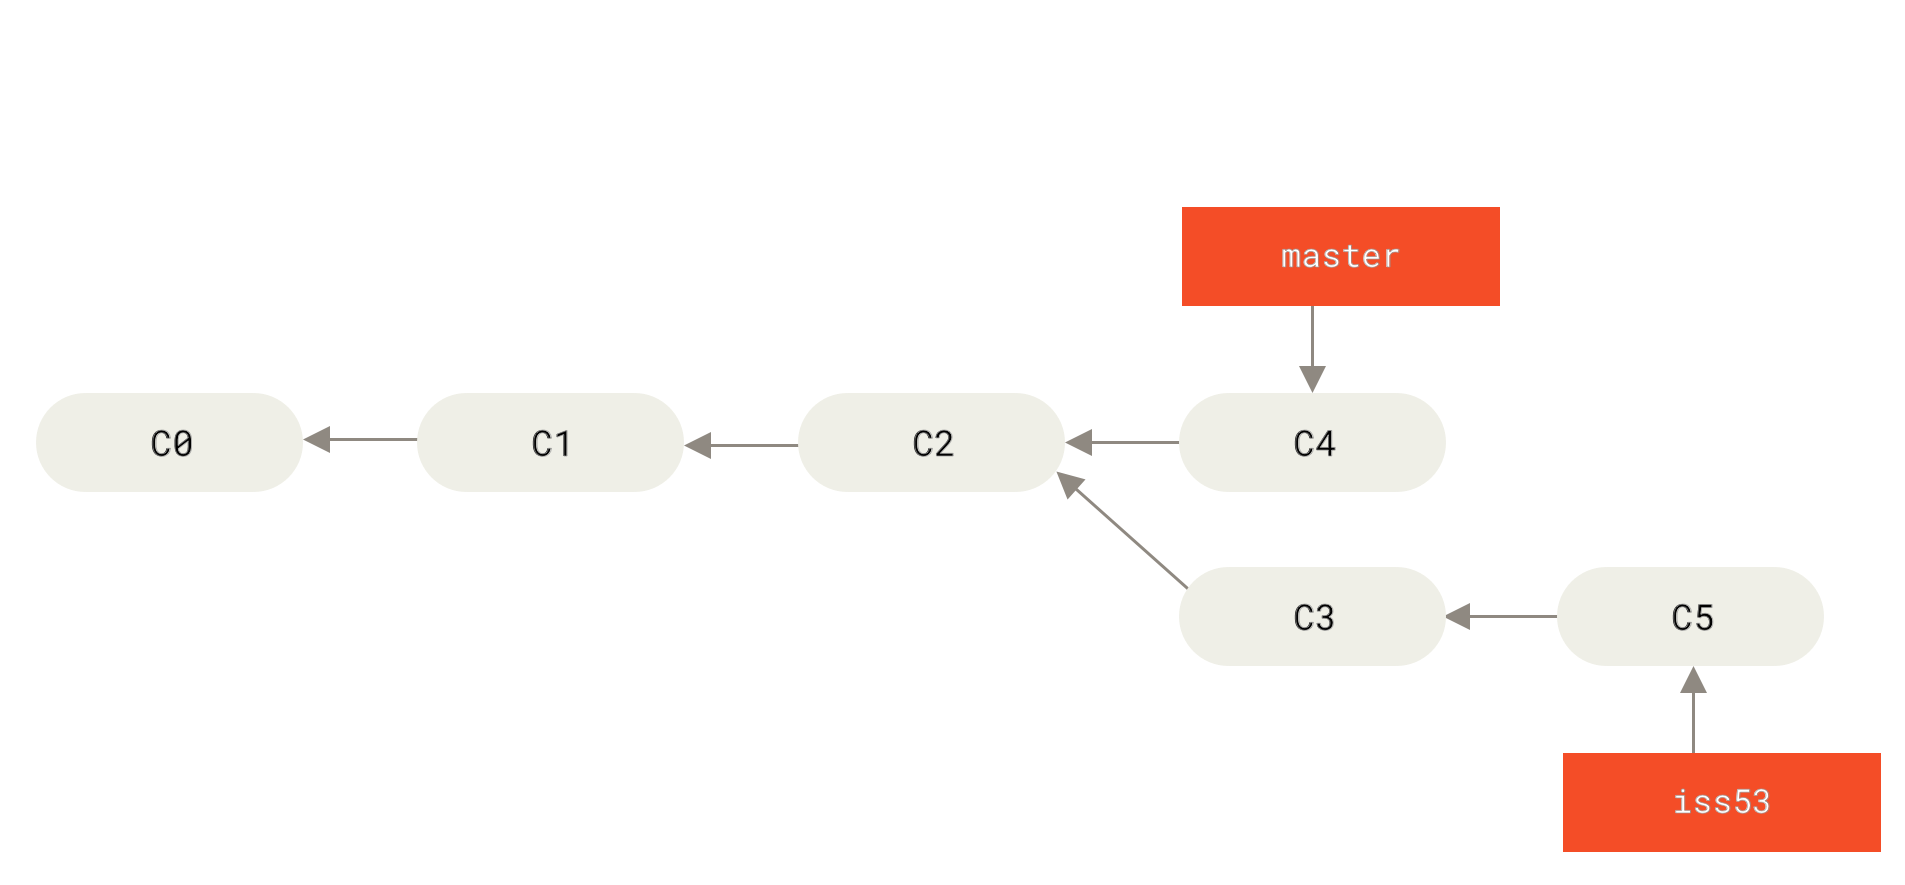
Figure 23. Work continues on iss53
It’s worth noting here that the work you did in your hotfix branch is not contained in the files in your iss53 branch (Điều đáng chú ý ở đây là công việc bạn đã làm trong chi nhánh hotfix của bạn không được chứa trong các tệp trong chi nhánh iss53 của bạn). If you need to pull it in (nếu bạn cần kéo nó vào), you can merge your master branch into your iss53 branch by running git merge master, or you can wait to integrate those changes (đợi tích hợp những thay đổi đó) until you decide (cho đến khi bạn quyết định) to pull (kéo) the iss53 branch back into master later.
Basic Merging
Suppose (giả sử) you’ve decided (bạn đã quyết định) that your issue #53 work is complete and ready to be merged into your master branch. In order to do that (để làm điều đó), you’ll merge your iss53 branch into master, much like (giống như) you merged your hotfix branch earlier (đơn giản hơn). All you have to do is check out the branch you wish (muốn) to merge into and then run the git merge command:
$ git checkout master
Switched to branch 'master'
$ git merge iss53
Merge made by the 'recursive' strategy.
index.html |    1 +
1 file changed, 1 insertion(+)
This looks a bit different (một chút khác biệt) than the hotfix merge you did earlier (bạn đã làm trước đó). In this case, your development history has diverged (lịch sử phát triển có sự phân nhánh) from some older point. Because the commit on the branch you’re on isn’t a direct ancestor of the branch you’re merging in (Bởi vì nhánh nhánh bạn đang truy cập không phải là nhánh cha trực tiếp của nhánh mà bạn đang hợp nhất), Git has to do some work. In this case, Git does a simple three-way merge (git thực hiện 3 đường hợp nhất đơn giản), using the two snapshots pointed to by the branch tips (được chỉ ra bởi tips/mẹo) and the common ancestor of the two(tổ tiên chung của cả hai).
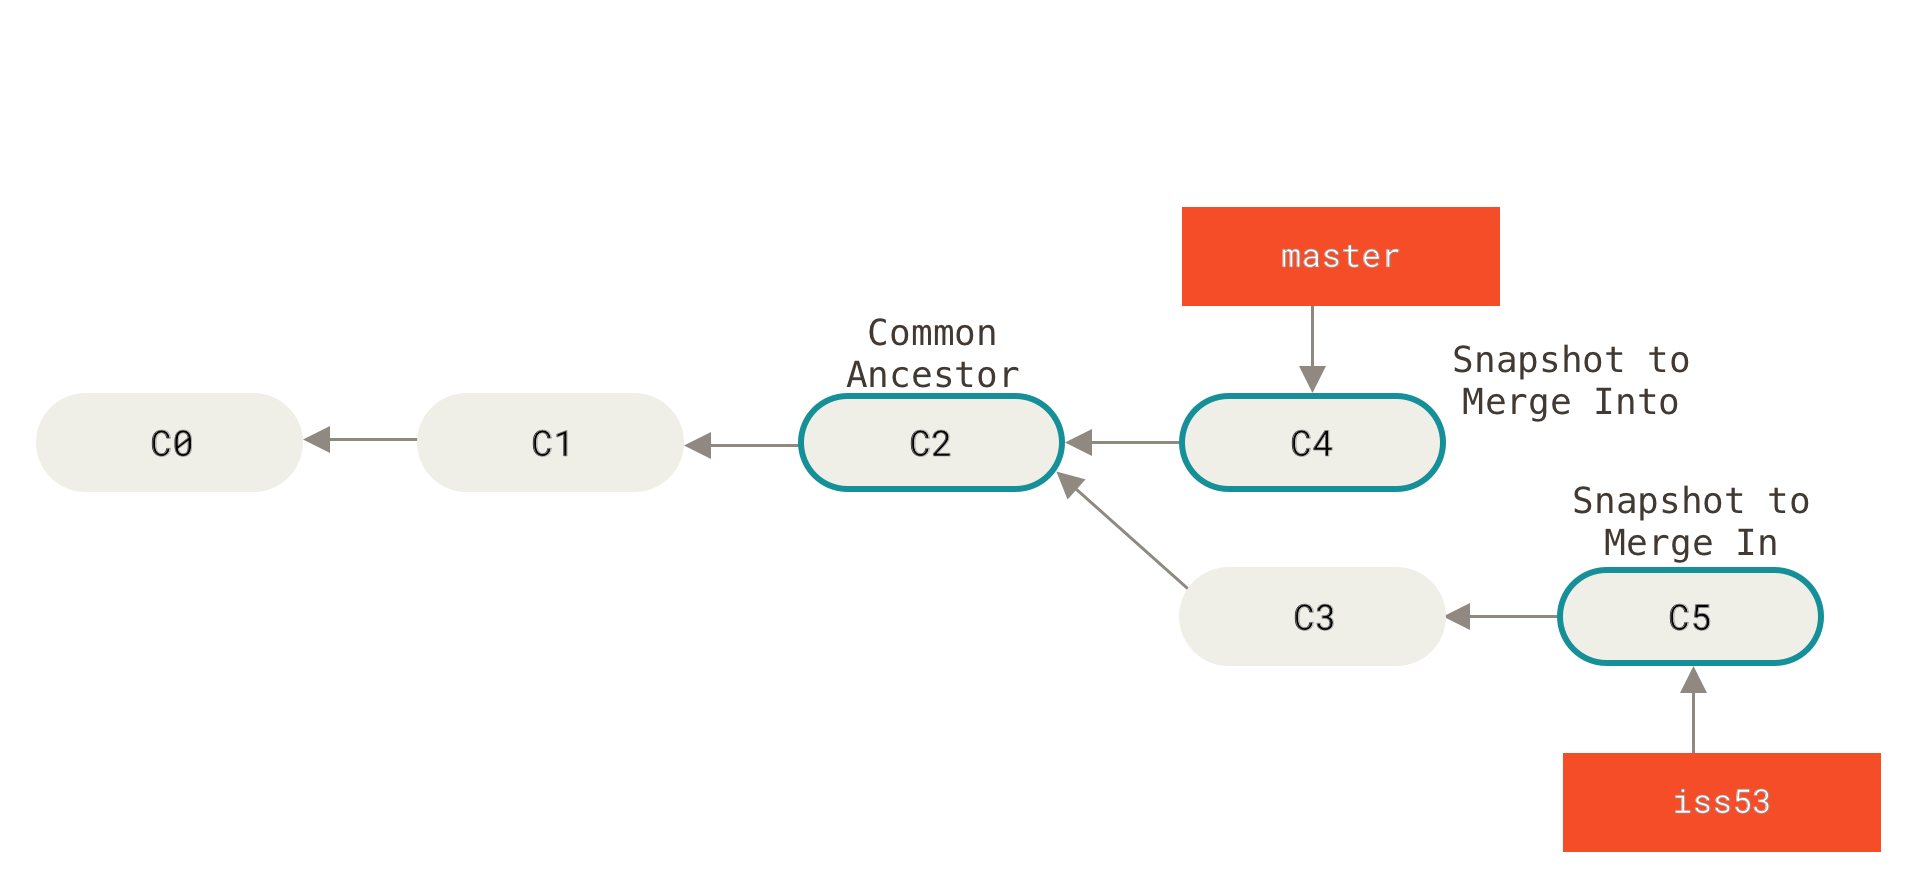
Figure 24. Three snapshots used in a typical merge
Instead of just moving the branch pointer forward (thay vì di chuyển con trỏ nhánh về phía trước), Git creates a new snapshot that results (là kết quả) from this three-way merge (3 đường hợp nhất) and automatically creates a new commit that points to it (trỏ đến nó). This is referred to as a merge commit (Điều này được gọi là merge commit), and is special in that it has more than one parent (điều đặc biệt ở chỗ nó có nhiều hơn 1 cha).
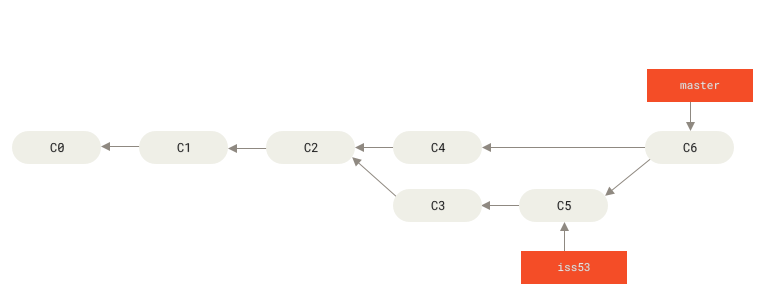
Figure 25. A merge commit
Now that your work is merged in, you have no further need for the iss53 branch (không cần nhánh iss53). You can close the ticket in your ticket-tracking system, and delete the branch:
$ git branch -d iss53Basic Merge Conflicts
Occasionally (thỉnh thoảng), this process doesn’t go smoothly (quá trình này không diễn ra suôn sẻ). If you changed the same part of the same file (thay đổi cùng một phần trên cùng một file) differently in the two branches you’re merging together (ở hai nhánh mà bạn muốn hợp nhất với nhau), Git won’t be able to merge them cleanly (Git sẻ không thể hợp nhất chúng một cách sạch sẻ). If your fix for issue #53 modified the same part of a file as the hotfix branch, you’ll get a merge conflict (xung đột hợp nhất) that looks something like this:
$ git merge iss53
Auto-merging index.html
CONFLICT (content): Merge conflict in index.html
Automatic merge failed; fix conflicts and then commit the result.
Git hasn’t automatically created a new merge commit. It has paused (tạm dừng) the process while you resolve the conflict (giải quyết xung đột). If you want to see which files are unmerged at any point (những file nào không thể hợp nhất tại bất kỳ điểm) after (sau khi) a merge conflict, you can run
git status:$ git status
On branch master
You have unmerged paths.
(fix conflicts and run "git commit")
Unmerged paths:
(use "git add <file>..." to mark resolution)
both modified: index.html
no changes added to commit (use "git add" and/or "git commit -a")
Anything that has merge conflicts (bất kì điều gì làm xung đột hợp nhất) and hasn’t been resolved (không thể giải quyết) is listed as unmerged (được chỉ ra ở mục unmerged). Git adds standard conflict-resolution markers (điểm đánh dấu xung đột tiêu chuẩn) to the files that have conflicts, so you can open them manually(thủ công) and resolve those conflicts (giải quyết các xung đột đó). Your file contains a section (phần) that looks something like this:
<<<<<<< HEAD:index.html
<div id="footer">contact : email.support@github.com</div>
=======
<div id="footer">
 please contact us at support@github.com
</div>
>>>>>>> iss53:index.html
This means the version in HEAD (your master branch, because that was what you had checked out when you ran your merge command (chi nhánh chính của bạn, bởi vì đó là những gì bạn đã check out khi bạn chạy lệnh merge của mình)) is the top part of that block (là phần trên cùng của khối đó) (everything above (những gì phía trên) the =======), while the version in your iss53 branch looks like everything in the bottom part (những gì ở phần dưới). In order to resolve the conflict (để giải quyết xung đột), you have to either choose one side or the other or merge the contents yourself (bạn phải chọn bên trên hoặc bên dưới hoặc tự hợp nhất nội dung của bạn). For instance (ví dụ), you might resolve (bạn có thể giải quyết) this conflict by replacing the entire block with this (thay thế toàn bộ khối theo cách này):
<div id="footer">
please contact us at email.support@github.com
</div>
This resolution has a little of each section (Cách giải quyết này chứa một phần nhỏ của mỗi phần), and the <<<<<<<, =======, and >>>>>>> lines have been completely removed (loại bỏ hoàn toàn). After you’ve resolved each of these sections (đã giải quyết từng phần) in each conflicted file, run git add on each file to mark it as resolved (đánh dấu nó đã giải quyết). Staging the file marks it as resolved in Git.
If you want to use a graphical tool to resolve these issues, you can run git mergetool, which fires up an appropriate visual merge tool and walks you through the conflicts (sẽ kích hoạt công cụ visual merge thích hợp và hướng dẫn bạn qua các xung đột:):
$ git mergetool

This message is displayed because 'merge.tool' is not configured.
See 'git mergetool --tool-help' or 'git help config' for more details.
'git mergetool' will now attempt to use one of the following tools:
opendiff kdiff3 tkdiff xxdiff meld tortoisemerge gvimdiff diffuse diffmerge ecmerge p4merge araxis bc3 codecompare vimdiff emerge
Merging:
index.html

Normal merge conflict for 'index.html':
  {local}: modified file
  {remote}: modified file
Hit return to start merge resolution tool (opendiff):
If you want to use a merge tool other than the default (Git chose
opendiff in this case because the command was run on a Mac), you can see all the supported tools listed at the top (được chỉ ra ở trên đầu) after (sau dòng chữ) “one of the following tools.” Just type the name of the tool you’d rather use (chỉ cần nhập tên công cụ bạn muốn sử dụng).Note
If you need more advanced tools (các công cụ nâng cao) for resolving tricky (giải quyết khôn khéo) merge conflicts, we cover more (đề cập thêm) on merging in Advanced Merging.
After you exit the merge tool, Git asks you if the merge was successful. If you tell the script that it was, it stages the file to mark it as resolved for you. You can run git status again to verify(xác minh) that all conflicts have been resolved:
$ git status
On branch master
All conflicts fixed but you are still merging.
  (use "git commit" to conclude merge)

Changes to be committed:

    modified:   index.html
If you’re happy with that (hài lòng với điều đó), and you verify(xác minh) that everything that had conflicts has been staged, you can type git commit to finalize (hoàn tất) the merge commit. The commit message by default looks something like this:
Merge branch 'iss53'

Conflicts:
    index.html
#
# It looks like you may be committing a merge.
# If this is not correct, please remove the file
# .git/MERGE_HEAD
# and try again.


# Please enter the commit message for your changes. Lines starting
# with '#' will be ignored, and an empty message aborts the commit.
# On branch master
# All conflicts fixed but you are still merging.
#
# Changes to be committed:
# modified:   index.html
#
If you think it would be helpful (điều này có thể hữu ích) to others looking (người khác xem) at this merge in the future (tương lai) , you can modify(thay đổi) this commit message with details about how you resolved the merge and explain why you did the changes you made (nội dung về làm cách nào để giải quyết hợp nhất và giải thích lý do tại sao bạn thực hiện các thay đổi mà bạn đã làm) if these are not obvious (nếu những thông báo trên không rõ ràng).
Không có nhận xét nào:
Đăng nhận xét